18th October 2006
Radicore is a Rapid Application Development toolkit for building administrative web applications which are platform independent, browser independent and database independent. There are two distinct parts to this framework:
Starting with nothing more than a database schema it is possible to import that schema directly from the database server into Radicore's Data Dictionary, and from there to generate the components which will maintain the contents of the database tables without having to write a single line of code. Code generation is a two-part process:
Other frameworks use nothing more than the INFORMATION_SCHEMA within the database to provide details about a database table and the columns (fields) which it contains, but this has one serious drawback - it only contains information for use by the RDBMS. A data dictionary on the other hand can be customised to contain whatever information is required by the application, therefore is a much more powerful tool.
After creating the code for a series of transactions the next step is to actually run those transactions, and the Radicore framework has a series of pre-built functions which can be utilised 'out of the box'. Among these are:
The purpose of this tutorial is to demonstrate how the Radicore framework can be used to generate and execute a series of maintenance transactions starting with nothing more than a database schema. Although fully functional transactions are initially generated without having to write a single line of code you may edit the generated scripts if you wish, such as to change the screen layout, to change HTML controls, or to implement complex business rules.
It would also be a good idea to read the RADICORE Programming Guidelines before you start any new development. You may be used to programming conventions which have no meaning to RADICORE, so you need to know what works and what does not.
For this tutorial I shall use a database called test which has the following schema:
CREATE TABLE IF NOT EXISTS `x_option` (
  `option_id` varchar(8) NOT NULL default '',
  `option_desc` varchar(40) NOT NULL default '',
  `created_date` datetime NOT NULL default '2000-01-01 00:00:00',
  `created_user` varchar(16) NOT NULL default 'UNKNOWN',
  `revised_date` datetime default NULL,
  `revised_user` varchar(16) default NULL,
  PRIMARY KEY  (`option_id`)
) ENGINE=MyISAM;

CREATE TABLE IF NOT EXISTS `x_pers_opt_xref` (
  `person_id` varchar(8) NOT NULL default '',
  `option_id` varchar(8) NOT NULL default '',
  `created_date` datetime NOT NULL default '2000-01-01 00:00:00',
  `created_user` varchar(16) NOT NULL default 'UNKNOWN',
  `revised_date` datetime default NULL,
  `revised_user` varchar(16) default NULL,
  PRIMARY KEY  (`person_id`,`option_id`),
  KEY `option_id` (`option_id`)
) ENGINE=MyISAM;

CREATE TABLE IF NOT EXISTS `x_pers_type` (
  `pers_type_id` varchar(6) NOT NULL default '',
  `pers_type_desc` varchar(40) NOT NULL default '',
  `created_date` datetime NOT NULL default '2000-01-01 00:00:00',
  `created_user` varchar(16) NOT NULL default 'UNKNOWN',
  `revised_date` datetime default NULL,
  `revised_user` varchar(16) default NULL,
  PRIMARY KEY  (`pers_type_id`)
) ENGINE=MyISAM;

CREATE TABLE IF NOT EXISTS `x_person` (
  `person_id` varchar(8) NOT NULL default '',
  `pers_type_id` varchar(6) NOT NULL default '',
  `node_id` smallint(4) unsigned NOT NULL default '0',
  `nat_ins_no` varchar(10) NOT NULL default '',
  `first_name` varchar(20) NOT NULL default '',
  `last_name` varchar(30) NOT NULL default '',
  `initials` varchar(6) default NULL,
  `star_sign` char(3) NOT NULL default '',
  `email_addr` varchar(50) default NULL,
  `value1` smallint(5) unsigned default NULL,
  `value2` decimal(10,2) unsigned default NULL,
  `last_addr_no` smallint(4) unsigned default '0',
  `start_date` date NOT NULL default '2000-01-01',
  `end_date` date default '9999-12-31',
  `picture` varchar(40) default NULL,
  `favourite_food` set('1','2','3','4','5','6','7','8','9','10') default NULL,
  `fckeditor_test` text,
  `created_date` datetime NOT NULL default '2000-01-01 00:00:00',
  `created_user` varchar(16) NOT NULL default 'UNKNOWN',
  `revised_date` datetime default NULL,
  `revised_user` varchar(16) default NULL,
  PRIMARY KEY  (`person_id`),
  UNIQUE KEY `nat_ins_no` (`nat_ins_no`),
  KEY `pers_type_id` (`pers_type_id`)
) ENGINE=InnoDB;

CREATE TABLE IF NOT EXISTS `x_person_addr` (
  `person_id` varchar(8) NOT NULL default '',
  `address_no` smallint(4) unsigned NOT NULL default '0',
  `telephone_no` varchar(20) default NULL,
  `fax_no` varchar(20) default NULL,
  `addr_line_1` varchar(30) NOT NULL default '',
  `addr_line_2` varchar(30) default NULL,
  `addr_line_3` varchar(30) default NULL,
  `town` varchar(30) NOT NULL default '',
  `county` varchar(30) default NULL,
  `postcode` varchar(10) NOT NULL default '',
  `start_date` date NOT NULL default '2000-01-01',
  `end_date` date default '9999-12-31',
  `created_date` datetime NOT NULL default '2000-01-01 00:00:00',
  `created_user` varchar(16) NOT NULL default 'UNKNOWN',
  `revised_date` datetime default NULL,
  `revised_user` varchar(16) default NULL,
  PRIMARY KEY  (`person_id`,`address_no`)
) ENGINE=InnoDB;

CREATE TABLE IF NOT EXISTS `x_tree_level` (
  `tree_type_id` varchar(8) NOT NULL default '',
  `tree_level_id` tinyint(3) unsigned NOT NULL default '0',
  `tree_level_seq` tinyint(3) unsigned NOT NULL default '0',
  `tree_level_desc` varchar(40) NOT NULL default '',
  `created_date` datetime NOT NULL default '2000-01-01 00:00:00',
  `created_user` varchar(16) NOT NULL default 'UNKNOWN',
  `revised_date` datetime default NULL,
  `revised_user` varchar(16) default NULL,
  PRIMARY KEY  (`tree_type_id`,`tree_level_id`)
) ENGINE=MyISAM;

CREATE TABLE IF NOT EXISTS `x_tree_node` (
  `node_id` smallint(5) unsigned NOT NULL default '0',
  `tree_type_id` varchar(8) NOT NULL default '',
  `tree_level_id` tinyint(3) unsigned NOT NULL default '0',
  `node_desc` varchar(40) NOT NULL default '',
  `node_id_snr` smallint(5) unsigned default NULL,
  `external_code` varchar(255) default NULL,
  `created_date` datetime NOT NULL default '2000-01-01 00:00:00',
  `created_user` varchar(16) NOT NULL default 'UNKNOWN',
  `revised_date` datetime default NULL,
  `revised_user` varchar(16) default NULL,
  PRIMARY KEY  (`node_id`),
  KEY `tree_type_id` (`tree_type_id`,`tree_level_id`),
  KEY `node_id_snr` (`node_id_snr`)
) ENGINE=MyISAM;

CREATE TABLE IF NOT EXISTS `x_tree_type` (
  `tree_type_id` varchar(8) NOT NULL default '',
  `tree_type_desc` varchar(40) NOT NULL default '',
  `created_date` datetime NOT NULL default '2000-01-01 00:00:00',
  `created_user` varchar(16) NOT NULL default 'UNKNOWN',
  `revised_date` datetime default NULL,
  `revised_user` varchar(16) default NULL,
  PRIMARY KEY  (`tree_type_id`)
) ENGINE=MyISAM;
This has the structure shown in figure 1:
Figure 1 - Entity-Relationship Diagram (ERD)
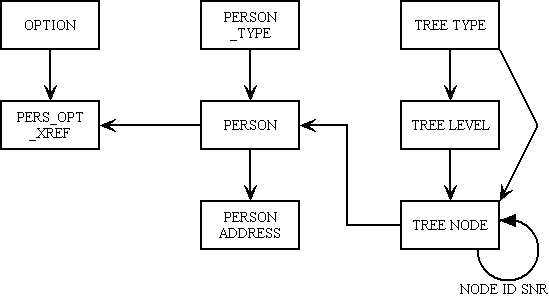
This database was specifically constructed to show how the framework can deal with single tables, one-to-many relationships, many-to-many relationships, and even self-relationships. There is even an implementation of my flexible tree structure.
After creating the database entry called test simply run the schema shown above to create the tables within that database. This will enable the details to be accessed from the INFORMATION_SCHEMA within the database server so that they can be imported into the data dictionary.
The database schema can also be found at radicore/xample/sql/mysql/xample-schema.sql.
Sample data can be loaded using script radicore/xample/sql/mysql/xample-data.sql.
After having installed the framework according to the installation instructions you need to logon so that you can access the system. Point your browser to http://localhost/radicore/index.html (or wherever you have installed it) and enter the relevant credentials in the logon screen.
The following procedure need be done only once for each new application subsystem.
Navigate to home->menu system->subsystem, then press the New button. Fill in the details as shown in Figure 2:
Figure 2 - create subsystem
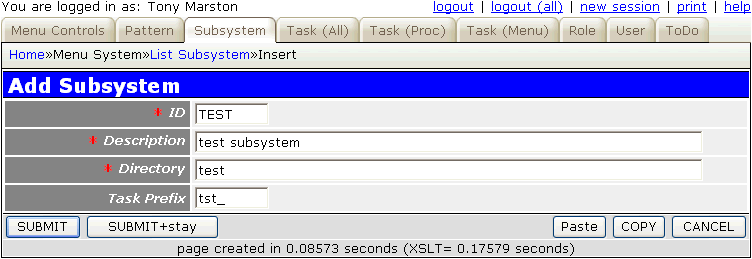
Although all the database tables have a prefix of x_ a different prefix is specified here for use on all the tasks that will be generated, to keep them separate from the existing tasks in the xample application which use the x_ prefix.
Press the 'Submit' button and the record will be added to the database, after which it will return to the 'List Subsystem' screen.
Within the List Subsystem screen (as shown in Figure 3) select the entry that has just been added, then press the Build Directory button in the navigation bar.
Figure 3 - build directory

This will cause the following actions to be performed:
default directory.default directory into the new directory.Figure 4 - initial menu for the new subsystem
Figure 5 - the subsystem menu appears on the home page

Navigate to home->dictionary->databases and press the Import Database button. This will bring up the screen as shown in Figure 6:
Figure 6 - import database
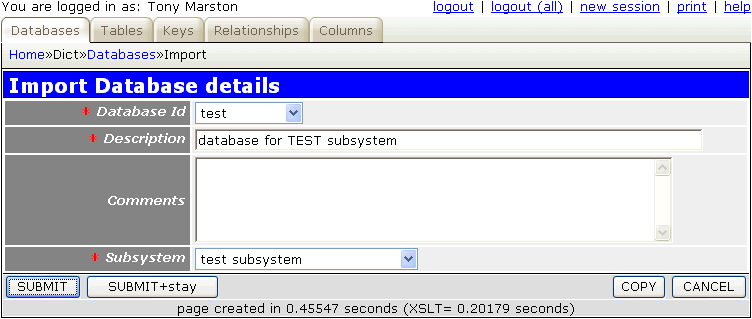
Fill in the details as follows:
| Database Id | The dropdown list will show those databases which currently do not have an entry in the dictionary database, so choose 'test'. |
| Description | Enter whatever text you desire. |
| Subsystem | Choose 'test' from the dropdown list. This will allow all scripts which are generated for this database to be created in that subsystem's directory, as created in Build Directory |
When the 'Submit' button is pressed this function will create an entry for this database on the DICT_DATABASE table, and create entries on the DICT_TABLE table for every table which currently exists within that database. It will then automatically display the results as shown in Figure 7:
Figure 7 - freshly imported database
Note that it does not automatically import the column details for any of these tables - this must be performed as a separate step. The number in the 'columns' column will show the value zero if the import column procedure has not yet been run on any table.
Should any new tables be added to a database schema at a later date then the Import Tables button can be used to import the details for those tables.
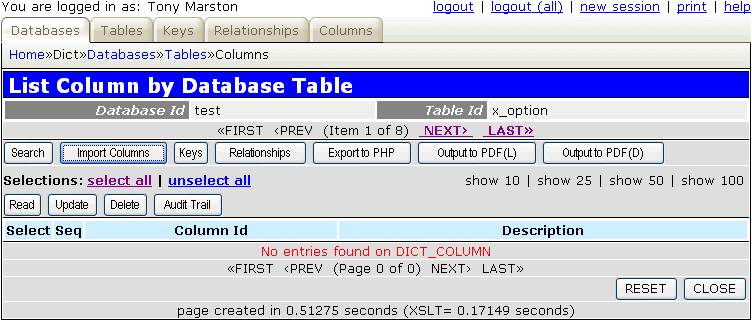
From the screen shown in Figure 7 press the 'select all' hyperlink to mark all tables as selected, then press the Columns button. This will bring up the screen shown in Figure 8.
This will show the current column details for the selected table. Note that at this moment there are no details to display. Also note that this screen has a scrolling area under the table name so that the user can move between the selected tables without having to return to the previous screen (Figure 7).
Figure 8 - empty column details
By pressing the Import Columns button a separate function will be called to import all the column details for the current table. When it has finished the results will be shown as in Figure 9:
Figure 9 - import column details
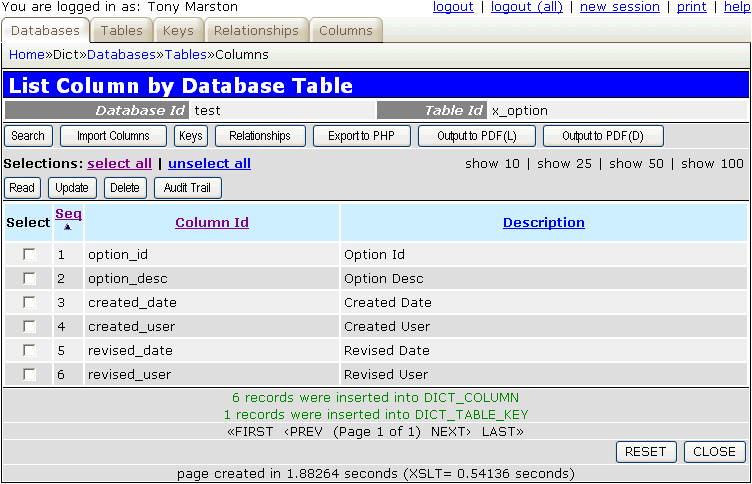
This will indicate how many entries have been added to the DICT_COLUMN and DICT_TABLE_KEY tables.
Note that this procedure will only import the column details for one table at a time. It must be repeated for every table within the database.
Should any changes be made to the database schema it is possible to rerun this task and it will automatically update the existing data in the dictionary to keep it synchronised with the database schema. This will deal with new columns, changed columns and deleted columns.
Before the application can use the information which resides in the dictionary it must be exported to a series of non-database files. This can be achieved by pressing the Export to PHP button, the results of which are shown in Figure 10:
Figure 10 - export to PHP
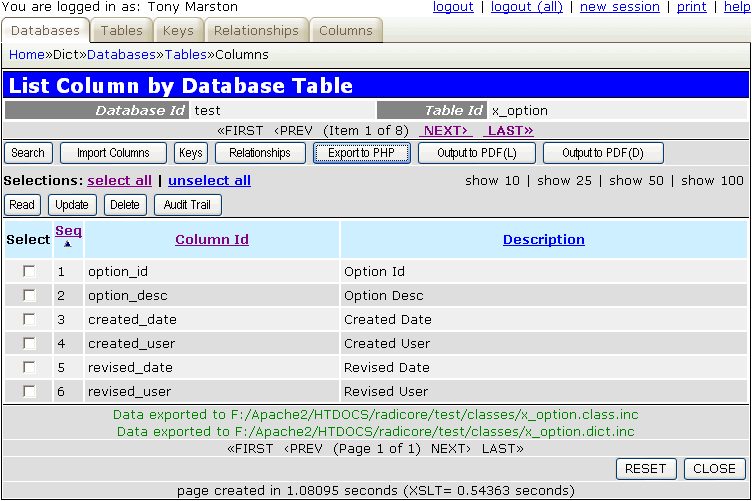
This procedure will create the following files in the subsystem's classes subdirectory:
After one table has had its details both imported and exported, the user can select the next table on the scrolling area and repeat the process for that table.
Relationships are not defined in the database (no, foreign key constraints are NOT the same as relationships), so they must be entered into the dictionary manually.
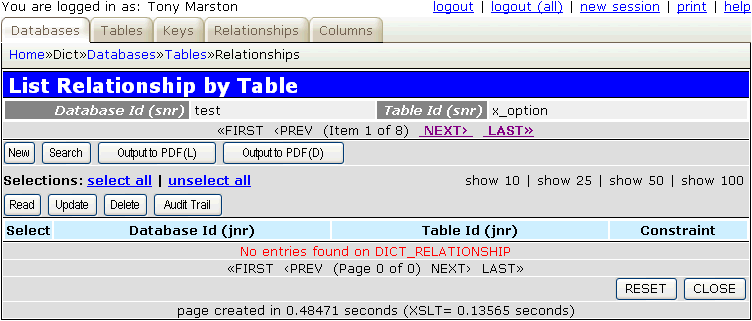
One-to-Many relationships (sometimes known as parent-to-child or senior-to-junior relationships) are defined in the dictionary by first selecting the one/parent/senior table, then selecting the many/child/junior table, followed by identifying which primary key field(s) on the one/parent/senior table correspond with which foreign key field(s) on the many/child/junior table. Start by navigating to the screen shown in Figure 7, select one or more tables, then press the Relationships (Table) button to bring up the screen shown in Figure 11:
Figure 11 - list relationships by table
Press the New button to bring up the screen shown in Figure 12:
Figure 12 - add relationship
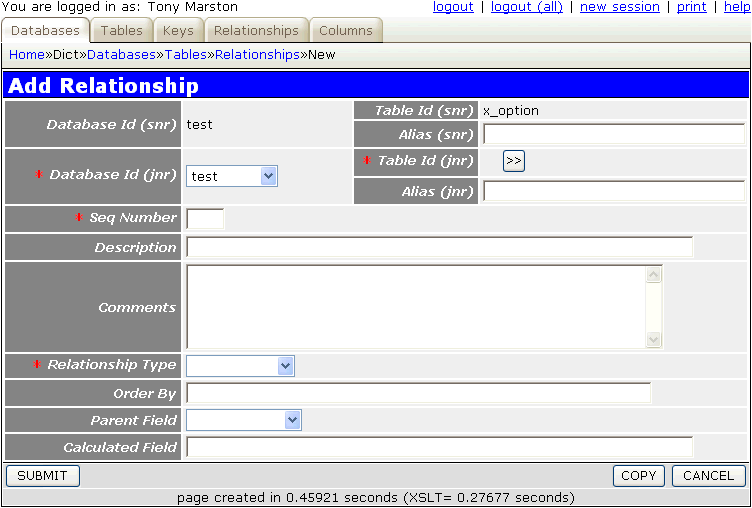
Fill in the details as follows:
| Table Id (jnr) | Use the popup button to select table X_PERS_OPT_XREF. |
| Seq Number | Leave this blank as it will default to '0' (zero). |
| Relationship Type | Choose RESTRICTED from the dropdown list. |
| Parent Field | Choose OPTION_DESC from the dropdown list. |
Press the 'Submit' button to update the database and bring up the screen shown in Figure 13:
Figure 13 - update relationship
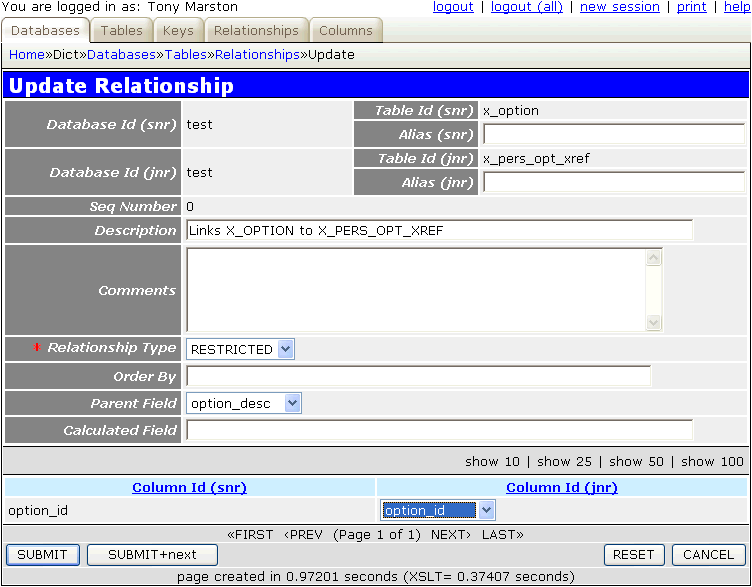
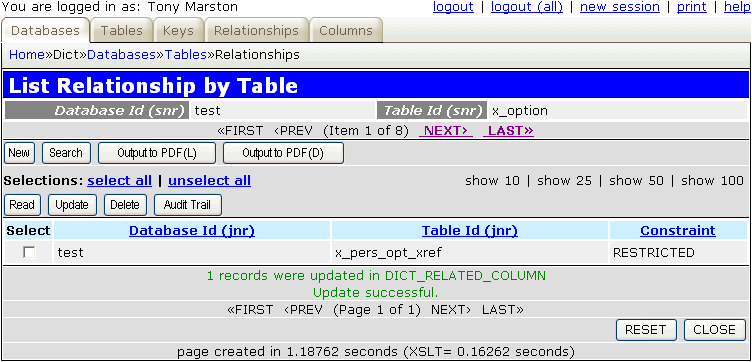
Now that a many/child/junior table has been specified this will allow the foreign key field(s) on the junior table to be linked with the corresponding primary key field(s) on the senior table. In this case the value 'option_id' should be selected from the dropdown list for 'Column ID (jnr)'. By pressing the Submit+next' button these details will be added to the database, and control will be passed back to the screen shown in Figure 14:
Figure 14 - list relationship by table
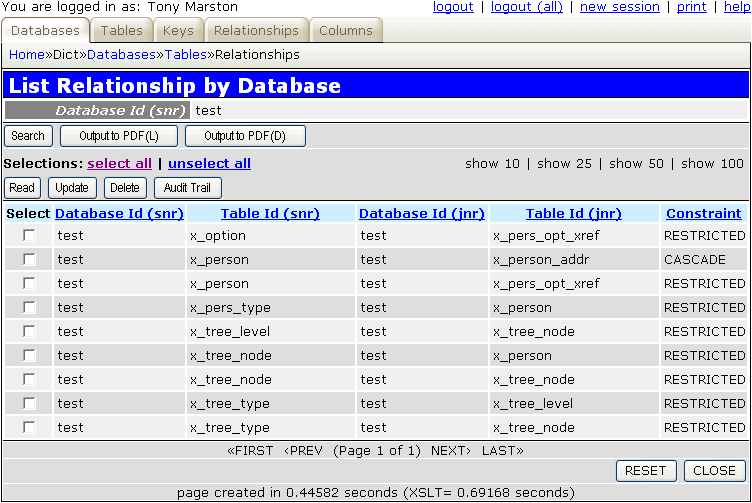
Repeat this procedure to enter all the relationship details contained in radicore-tutorial-001.pdf. You should end up with all the relationships shown in Figure 15:
Figure 15 - list relationships by database
In order to make these relationship details available to the application you must now repeat the Export to PHP process. Note that this will only overwrite the <tablename>.dict.inc files and leave the existing <tablename>.class.inc files untouched.
A transaction (also known as 'task') is a unit of work from the user's perspective. It is derived from business transaction and may or may not involve a database transaction. It is quite common for different transactions to have identical processing except that they work on different database tables, so in the Radicore framework all the different types of processing have been catalogued as a series of templates or Transaction Patterns and implemented as a series of pre-written and reusable modules (controller scripts and XSL stylesheets). All that is required to create a functioning transaction is to identify which template or Transaction Pattern needs to be implemented against which database table(s).
The most difficult part of this process is actually identifying which pattern to employ where, but as the framework (including the prototype applications) contains working examples of every documented pattern, it is possible to look for a working example which mirrors the processing that is desired, find out which pattern(s) were used to implement that example, then implement that same pattern for your own database tables. Some guidance is available at Choosing which template to use.
The first step is to identify which database table to use. Note that where a pattern uses more than one table in a senior-to-junior hierarchy, the most junior table in that hierarchy must be used as the target table, with the details of the other table(s) being defined later.
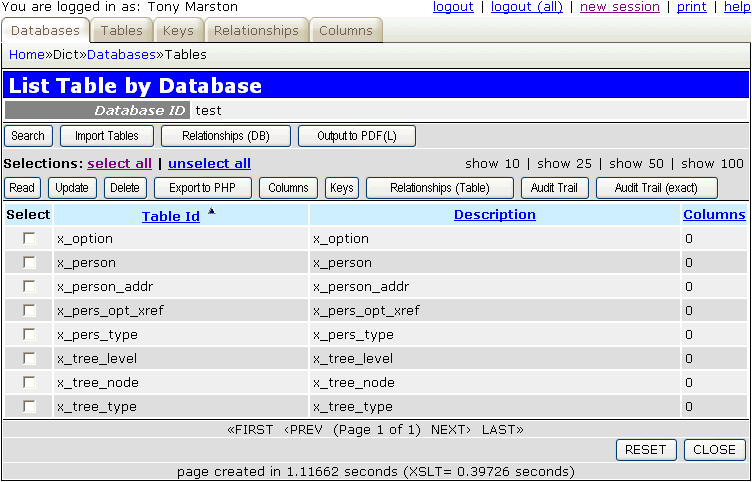
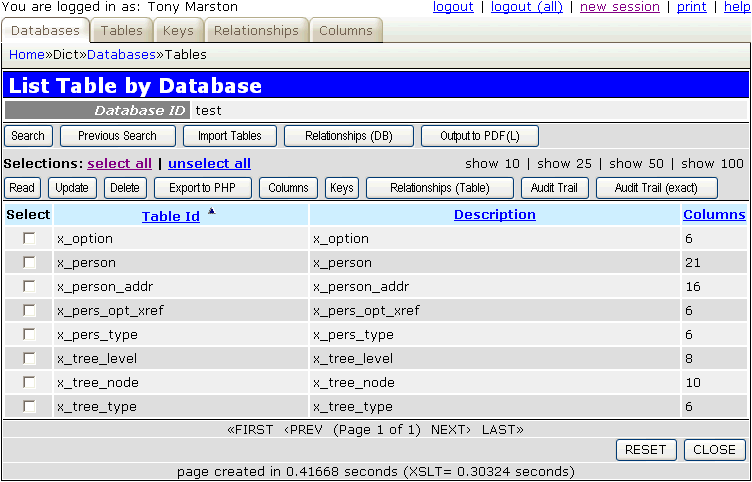
Navigate to home->dictionary->databases, select the 'test' database, then press the Tables button to bring up the screen shown in Figure 16:
Figure 16 - list table by database
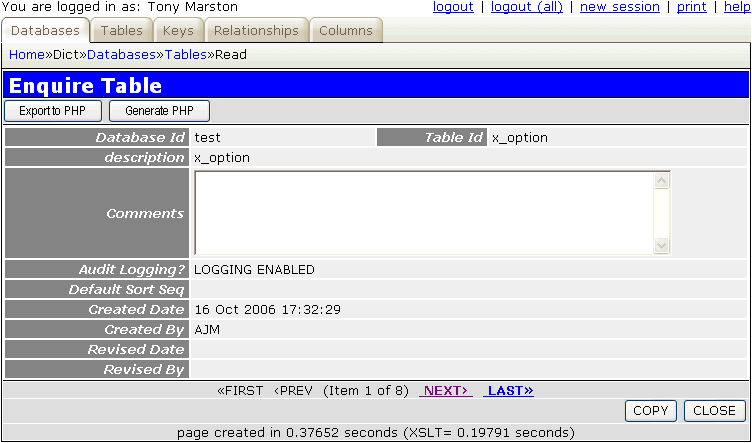
From here select the target table and press the Read button to bring up the screen shown in Figure 17:
Figure 17 - enquire table
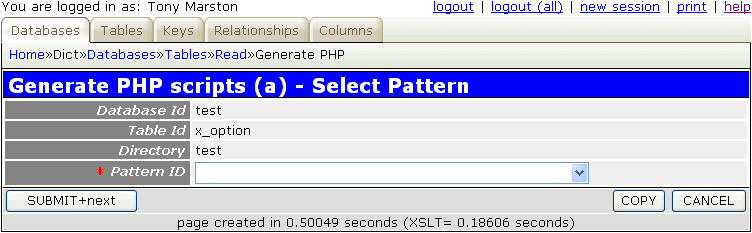
From here press the Generate PHP button to bring up the screen shown in Figure 18:
This will allow the user to select the relevant Transaction Pattern for the transaction which is about to be generated. It uses the screen as shown in Figure 18:
Figure 18 - select transaction pattern
After selecting he desired pattern from the dropdown list and pressing the 'Submit' button the user will automatically be taken to the next screen to enter the pattern details.
This screen will allow the user the enter the details of the additional components which are required to implement the selected pattern. The number of fields which are displayed will depend upon the pattern in question.
Figure 19 - enter pattern details
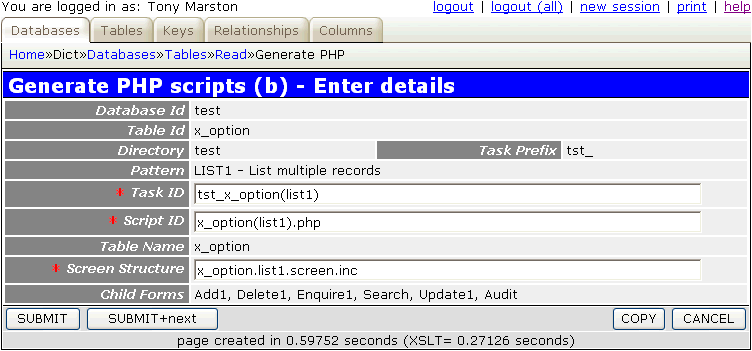
All the fields such as 'Task Id', 'Script Id' and 'Screen/Report Structure' will automatically be filled with default values, and may be modified if required. If any additional tables are required you will be asked to choose from a dropdown list. These additional tables must have the correct relationships defined in the dictionary in order to be valid.
When the 'Submit' button is pressed the following will be created:
By default when a screen structure file is generated it will contain a reference to every field for every database table that it contains. There may be too many fields, or they may be presented in the wrong order, but each screen can be customised simply by editing the individual screen structure file. There is no need to modify any HTML or even any XSL stylesheets.
The full list of editing options is documented in The MVC Design Pattern - XSL Structure file.
The text that is provided for screen titles, buttons and labels may not be exactly to your liking, so you will need to know how it can be customised. The first thing you need to know is from where the different pieces of text originate:
In order to allow such pieces of text to be easily provided in different languages this framework has an Internationalisation (I18N) feature which allows the actual text to be extracted from a series of language files, one set for each language. To aid in the construction of this file it is possible, after amending the MENU database to set the task descriptions, navigation button text and menu button text to the values you require, to run the Export Subsystem function to produce the text/<subsys_id>.menu_export.txt file. The contents of this file can then be transferred to the relevant text/<language>/language_text.inc file
As you can see, starting with nothing more than a database schema and using nothing more than the forms which are supplied as part of the framework it is possible to achieve the following:
All this without writing a single line of code!
Although what is created by these procedures is fully functional, it may be necessary to edit some of the generated files:
In Part 2 of this tutorial I shall go through the stages of creating the transactions to maintain the contents of the 'test' database, which includes various customisations in the 3 areas mentioned above.