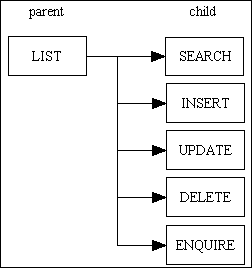
Figure 1 - a typical family of forms
In an earlier article, 'Using XSL and XML to generate dynamic web pages from UNIFACE', I demonstrated how it is possible to generate web pages using XSL to transform XML documents into HTML for output to the web. This replaces the UNIFACE-specific method of web page generation with a standard method that is supported by the World Wide Web Consortium and which gained popularity with the Apache Cocoon Project. In this follow-up article I will show you samples of web pages and explain the XSL stylesheets that I used to transform the XML data.
I have put together a set of PHP scripts which you can access here on my website which will show these techniques in action. These are described in A Sample PHP Application. The complete source code can be downloaded from here so you can see how it is achieved.
Note: An updated version of this document called Reusable XSL Stylesheets and Templates shows how to avoid the need to have customised versions of each XSL stylesheet which contain hard-coded field names. By passing the list of fields to be displayed within the XML data it is possible to use the same XSL stylesheet for many different screens.
This consists of an initial parent form and a series of child forms, as shown in Figure 1. The parent form may be accessed through a menu mechanism, but a child form can only be accessed through a parent form. This is because some form of context may need to be exchanged between the parent and the child.
This is a typical arrangement of simple, single-function components that I have been using in client/server systems for many years, and which just happens to be the recommended approach when designing components for the web.
The following are a series of screen shots from my demonstration system. I built these using a combination of PHP and MySQL running under the Apache web server (refer to A Sample PHP Application for details), but the techniques can be employed in any development language that can create XML files and has access to an XSL Transform engine.
You may notice that these screens are devoid of any fancy graphics - this is entirely deliberate as I am concentrating on the functionality, not the cosmetics. Fancy gimmicks, gizmos and doo-dads can be added in by anyone competent in HTML simply by modifying the HTML code in the XSL stylesheet, or by modifying the CSS file. Any customisation of the Presentation layer can therefore be carried out without affecting any component in the Business layer.
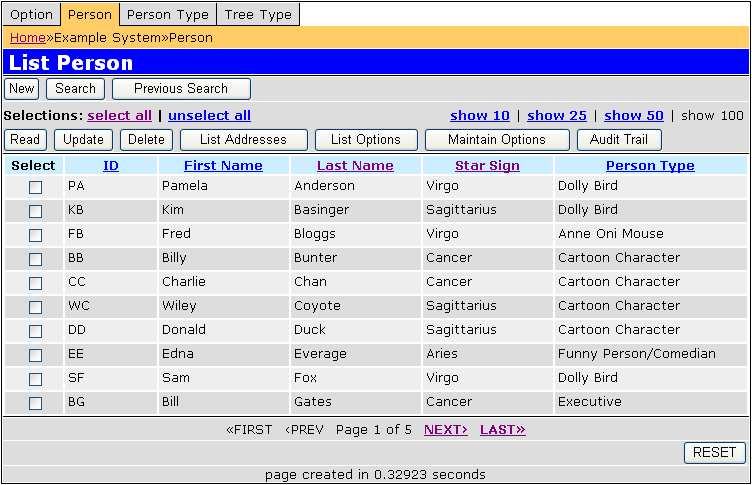
Figure 2 shows a form that lists occurrences from the PERSON table. As there may be more occurrences that can fit comfortably into the screen they are divided into 'pages' where each page will contain a maximum number of occurrences. Hyperlinks at the bottom the screen will allow the user to jump to different pages. There is also an area for standard 'action' buttons and an area for optional 'navigation' buttons. Each of these areas is explained in more detail in Figure 3.
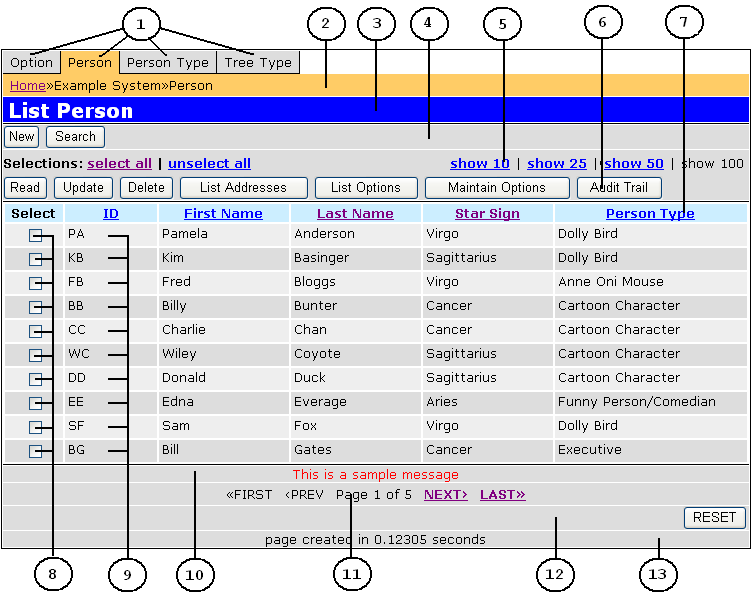
Figure 3 identifies and explains each of the different areas within the LIST screen shown in Figure 2.
Each of these areas is processed by a different set of stylesheet instructions, as will be explained later.
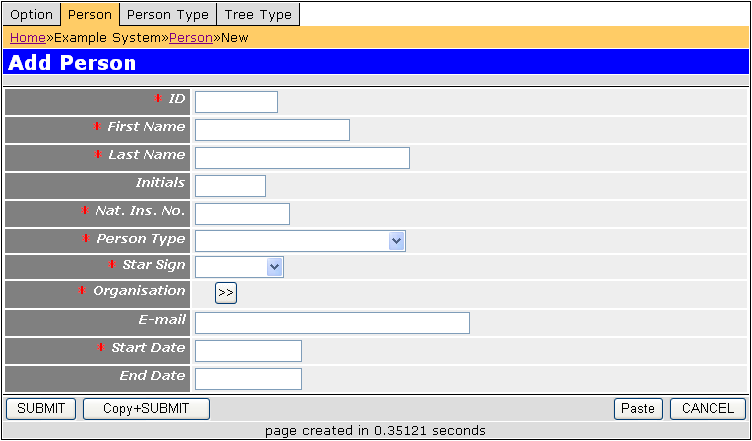
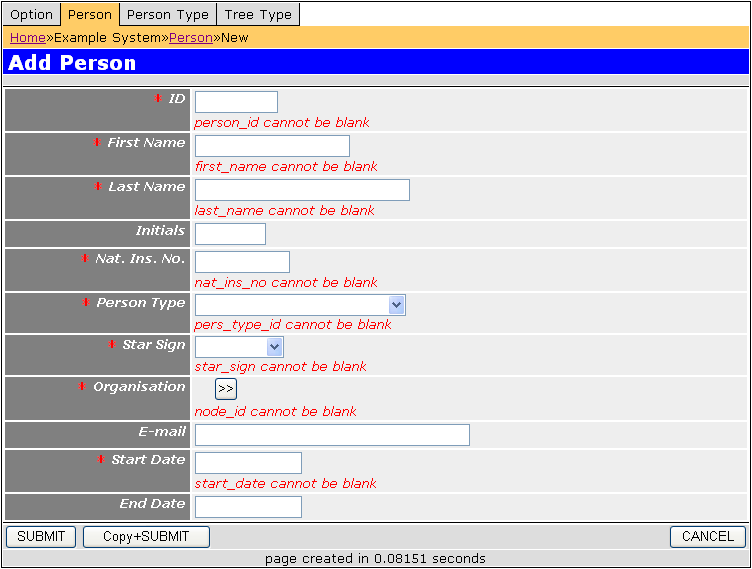
The INSERT form allows the user to enter the details for a new occurrence. Required fields are indicated with an asterisk in front of the field label. The SUBMIT button will cause the data to be added to the database (provided that all validation rules are satisfied), then it will return to the previous screen. The COPY+SUBMIT button will copy the current data into memory so that it is available for the PASTE button. The CANCEL button will ignore any entered data and return to the previous screen. Validation errors are dealt with as shown in Figure 5.
Any error message for a particular field will be displayed underneath that field's input area. If an error cannot be associated with a particular field then it will be displayed in the message area at the bottom of the screen (area 10 in Figure 3).
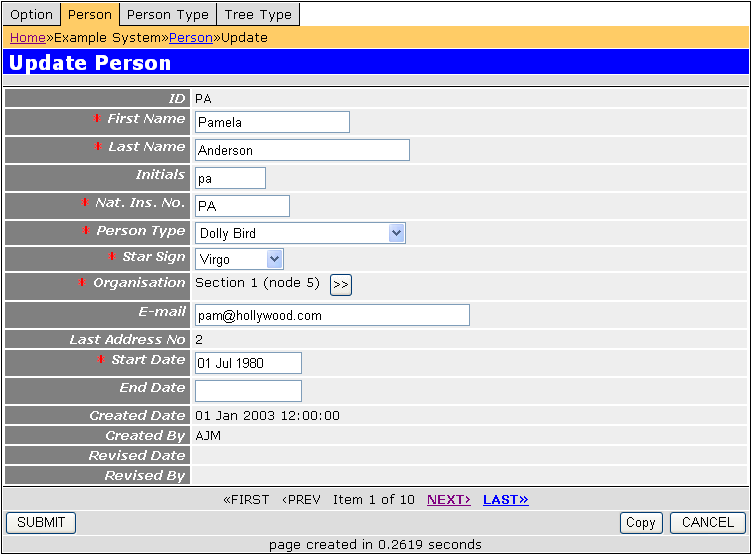
This will display the current values for the occurrence selected in the previous screen, then allow the user to make changes. Validation errors will be dealt with as shown in Figure 5. The COPY button will allow the current data to be saved in memory so that it can be included into an INSERT screen with the PASTE button.
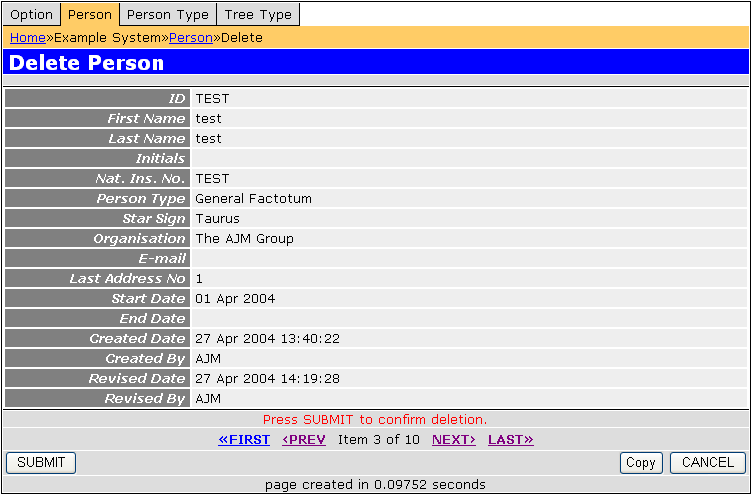
This will display the selected occurrence and allow the user to either confirm or cancel the deletion. If the current occurrence cannot be deleted an appropriate message will be displayed and the SUBMIT button will not be shown. The COPY button will allow the current data to be saved in memory so that it can be included into an INSERT screen with the PASTE button.
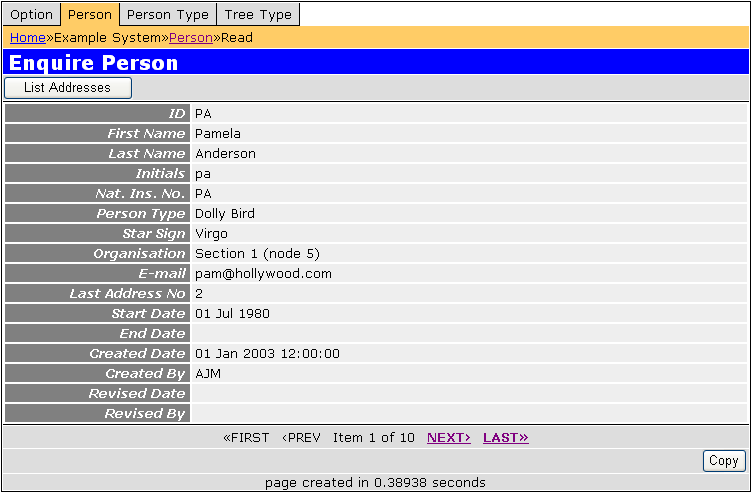
This will display the current values for the occurrence selected in the previous screen. The COPY button will allow the current data to be saved in memory so that it can be included into an INSERT screen with the PASTE button.
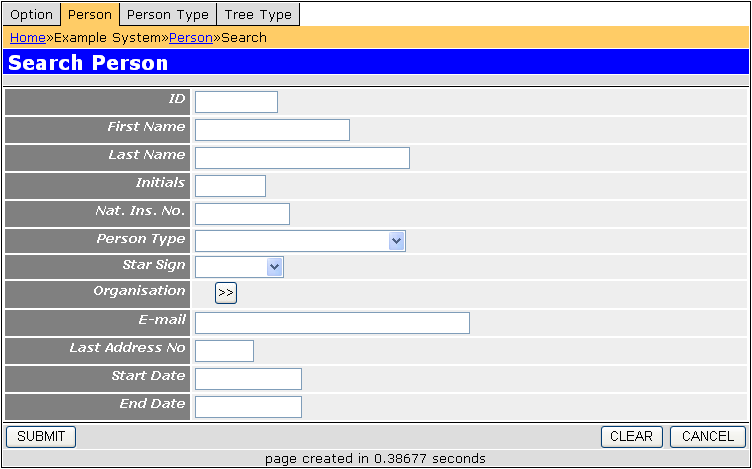
This will allow the user to specify different selection criteria to be used by the LIST screen. By pressing the SUBMIT button the new criteria will be used to rebuild the contents of the list screen, otherwise it will be rebuilt using the previous search criteria. If any search criteria have been entered previously then they will be shown, but can be removed using the CLEAR button.
The transformation process requires an XML file to provide the data and an XSL file to define the transformation rules.
This is an extract of the XML file that was used to create the HTML document shown in Figure 2.
<?xml version="1.0"?>
<xample>
  <person> (1)
    <person_id>AJM</person_id>
    <pers_type_id>BORING</pers_type_id>
    <node_id>10</node_id>
    <nat_ins_no>XX123456Y</nat_ins_no>
    <first_name>Tony</first_name>
    <last_name>Marston</last_name>
    <initials></initials>
    <star_sign>Capricorn</star_sign>
    <email_addr>tony@tonymarston.net</email_addr>
    <start_date>02 Jan 2001</start_date>
    <end_date></end_date>
  </person>
  <person> (1)
    ...
  </person>

  <navbar> (2)
    <button id="task#person(add)" context_preselect="N">New</button>
    <button id="task#person(enq)" context_preselect="Y">Read</button>
    <button id="task#person(upd)" context_preselect="Y">Update</button>
    <button id="task#person(del)" context_preselect="Y">Delete</button>
    <button id="task#person_addr(list)" context_preselect="Y">List Addresses</button>
    <button id="task#option(list)a" context_preselect="Y">List Options</button>
    <button id="task#pers_opt_xref(link)a" context_preselect="Y">Maintain Options</button>
    <button id="task#person(search)" context_preselect="N">Search</button>
    <button id="task#audit_dtl(list)2" context_preselect="Y">Audit Trail</button>
  </navbar>

  <actbar> (3)
    <button id="reset">RESET</button>
    <button id="close">CLOSE</button>
  </actbar>

  <message> (4)
    <line>This is a sample message.</line>
  </message>

  <menubar> (5)
    <button id="option(list)">Option</button>
    <button id="person(list)" active="y">Person</button>
    <button id="pers_type(list)">Person Type</button>
    <button id="tree_type(list)">Tree Type</button>
    <stack id="home">Home</stack>
    <stack id="menu02" active="y">Example System</stack>
    <stack id="person(list)">Person</stack>
  </menubar>

</xample>
Here is the description of the numbered items:
ID attribute identifies the value that will be passed in the POST array when the button is pressed. The context_preselect attribute identifies whether this button should be placed in the first or third line of the navigation bar (see areas 4 and 6 in figure 3).button entries will appear in area 1 of figure 3 and the stack entries will appear in area 2 of figure 3.This is an extract of the XSL file that was used to transform the previous XML data into the HTML document shown in Figure 2.
NOTE: This version has been superseded by a more reusable version which is documented in Reusable XSL Stylesheets and Templates. Instead of having a separate stylesheet for each database table where the field names and field labels have to be hard-coded I now use a more generic stylesheet and specify the field names and label names within the XML data.
<?xml version='1.0'?>
<xsl:stylesheet xmlns:xsl="http://www.w3.org/1999/XSL/Transform" version="1.0">

<xsl:output method='html'/>

<!-- param values may be changed during the XSL Transformation --> (1)
<xsl:param name="title">List PERSON</xsl:param>
<xsl:param name="script">person_list.php</xsl:param>
<xsl:param name="orderby">person_id</xsl:param>
<xsl:param name="order">asc</xsl:param>
<xsl:param name="numrows">0</xsl:param>
<xsl:param name="curpage">1</xsl:param>
<xsl:param name="lastpage">2</xsl:param>
<xsl:param name="script_time">0.2744</xsl:param>

<!-- include common templates --> (2)
<xsl:include href="std.actionbar.xsl"/>
<xsl:include href="std.column_hdg.xsl"/>
<xsl:include href="std.head.xsl"/>
<xsl:include href="std.message.xsl"/>
<xsl:include href="std.navbar.xsl"/>
<xsl:include href="std.pagination.xsl"/>
<xsl:include href="std.selectbox.xsl"/>

<xsl:template match="/"> <!-- standard match to include all child elements --> (3)

  <html xmlns="http://www.w3.org/1999/xhtml" xml:lang="en" lang="en">
    <xsl:call-template name="head" /> (4)
  <body>

  <form method="post" action="{$script}"> (5)

    <xsl:call-template name="navbar" /> (6)

    <div id="content">

      <h1><xsl:value-of select="$title"/></h1> (7)

      <!-- this is the actual data -->
      <table class="datatable">

        <thead>
          <tr>
            <!-- set up the column headings -->
            <th>Select</th>
            <th>
              <xsl:call-template name="column_hdg"> (8)
                <xsl:with-param name="item" select="'person_id'"/>
                <xsl:with-param name="label" select="'ID'"/>
              </xsl:call-template>
            </th>
            <th>
              <xsl:call-template name="column_hdg"> (8)
                <xsl:with-param name="item" select="'first_name'"/>
                <xsl:with-param name="label" select="'First Name'"/>
              </xsl:call-template>
            </th>
            <th>
              <xsl:call-template name="column_hdg"> (8)
                <xsl:with-param name="item" select="'last_name'"/>
                <xsl:with-param name="label" select="'Last Name'"/>
              </xsl:call-template>
            </th>
            <th>
              <xsl:call-template name="column_hdg"> (8)
                <xsl:with-param name="item" select="'star_sign'"/>
                <xsl:with-param name="label" select="'Star Sign'"/>
              </xsl:call-template>
            </th>

          </tr>
        </thead>

        <tbody>
          <!-- add a table row for each record in the XML file -->
          <xsl:apply-templates select="//person" /> (9)
        </tbody>

      </table>

      <!-- look for optional messages -->
      <xsl:call-template name="message"/> (10)

      <!-- insert the page navigation links -->
      <xsl:call-template name="pagination" /> 11)

      <!-- create standard action buttons -->
      <xsl:call-template name="actbar"/> (12)

    </div>
  </form>
  </body>
  </html>

</xsl:template>

<xsl:template match="person"> (13)

  <!-- set the row class to 'odd' or 'even' to determine the colour -->
  <tr>
    <xsl:attribute name="class"> (14)
      <xsl:choose>
        <xsl:when test="position()mod 2">odd</xsl:when>
        <xsl:otherwise>even</xsl:otherwise>
      </xsl:choose>
    </xsl:attribute>

    <td>
      <!-- this cell contains the checkbox to make selections -->
      <xsl:call-template name="selectbox"/> (15)
    </td>

    <!-- these table cells contain the actual data -->
    <td><xsl:value-of select="person_id"/></td> (16)
    <td><xsl:value-of select="first_name"/></td> (16)
    <td><xsl:value-of select="last_name"/></td> (16)
    <td><xsl:value-of select="star_sign"/></td> (16)

  </tr>

</xsl:template>

</xsl:stylesheet>
Here is the description of the numbered items:
"/"). This is why each XML document must contain one and only one root node. This code block ends with the corresponding </xsl:template> line.head which is contained in std.head.xsl.navbar which is contained in std.navbar.xsl.column_hdg which is contained in std.column_hdg.xsl. Note that two parameters are also passed.message which is contained in std.message.xsl.pagination which is contained in std.pagination.xsl.actbar which is contained in std.actionbar.xsl.</xsl:template> line.CLASS attribute of the TR tag accordingly. The properties of each CLASS are defined in a separate CSS file and identify which colour is to be used as the background for each row.selectbox which is contained in std.selectbox.xsl. This is placed in the first cell of each row.The transformation process requires an XML file to provide the data and an XSL file to define the transformation rules.
This is an extract of the XML file that was used to create the HTML documents shown in Figure 4, Figure 5, Figure 6, Figure 7, Figure 8 and Figure 9.
<?xml version="1.0"?>
<xample>
  <person> (1)
    <person_id size="8" pkey="y">AJM</person_id>
    <pers_type_id size="6"
                  control="dropdown"
                  optionlist="pers_type_id">GENFAC</pers_type_id>
    <node_id size="4"
             control="popup"
             foreignfield="node_desc"
             popupname="tran#tree_structure_popup.php">10</node_id>
    <nat_ins_no size="10">XX123456Y</nat_ins_no>
    <first_name size="20">Tony</first_name>
    <last_name size="30">Marston</last_name>
    <initials size="6"></initials>
    <star_sign control="dropdown"
               optionlist="star_sign">Capricorn</star_sign>
    <email_addr size="50"
                error="this is an example of an error message">
                tony@tonymarston.net</email_addr>
    <start_date size="12">02 Jan 2001</start_date>
    <end_date size="12"></end_date>
    <node_desc noedit="y">Section 6 (node 10)</node_desc>
  </person>
  <lookup>
    <star_sign> (2)
      <option id="0"> </option>
      <option id="1">Aries</option>
      <option id="2">Aquarius</option>
      <option id="3">Cancer</option>
      <option id="4">Capricorn</option>
      <option id="5">Gemini</option>
      <option id="6">Leo</option>
      <option id="7">Libra</option>
      <option id="8">Pisces</option>
      <option id="9">Sagittarius</option>
      <option id="10">Scorpio</option>
      <option id="11">Taurus</option>
      <option id="12">Virgo</option>
    </star_sign>
    <pers_type_id> (3)
      <option id=" "> </option>
      <option id="ACTOR">Actor/Artiste</option>
      <option id="ANON">Anne Oni Mouse</option>
      <option id="BORING">Boring Person</option>
      <option id="CARTOO">Cartoon Character</option>
      <option id="DOLLY">Dolly Bird</option>
      <option id="EIGHT">Pieces of Eight</option>
      <option id="EXEC">Executive</option>
      <option id="FILM">Film Star</option>
      <option id="FUNNY">Funny Person/Comedian</option>
      <option id="GENFAC">General Factotum</option>
      <option id="IGTWIT">Ignorant Twit</option>
      <option id="JAMMY">Jammy Beggar</option>
      <option id="KLEPTO">Kleptomaniac</option>
    </pers_type_id>
  </lookup>
  <actbar> (4)
    <button id="submit">SUBMIT</button>
    <button id="cancel">CANCEL</button>
  </actbar>
  <message> (5)
    <line>This is another message</line>
  </message>
  <scrolling> (6)
    <scroll id="person" curitem="1" lastitem="2" />
  </scrolling>
</xample>
Here is the description of the numbered items:
ID="..." attribute identifies the value that will be returned to the web server when the button is pressed.This is an extract of the XSL file that was used to transform the previous XML data into the HTML documents shown in Figure 4, Figure 5, Figure 6, Figure 7, Figure 8 and Figure 9.
NOTE: This version has been superseded by a more reusable version which is documented in Reusable XSL Stylesheets and Templates. Instead of having a separate stylesheet for each database table where the field names and field labels have to be hard-coded I now use a more generic stylesheet and specify the field names and label names within the XML data.
<?xml version='1.0'?>
<xsl:stylesheet xmlns:xsl="http://www.w3.org/1999/XSL/Transform" version="1.0">

<xsl:output method='html'/>

<!-- param values may be changed during the XSL Transformation --> (1)
<xsl:param name="title">document title</xsl:param>
<xsl:param name="script">script_name</xsl:param>
<xsl:param name="mode">insert</xsl:param>
<xsl:param name="script_time">0.1234</xsl:param>

<!-- include common templates --> (2)
<xsl:include href="std.actionbar.xsl"/>
<xsl:include href="std.data_field.xsl"/>
<xsl:include href="std.head.xsl"/>
<xsl:include href="std.message.xsl"/>
<xsl:include href="std.scrolling.xsl"/>

<xsl:template match="/"> (3)

  <html xmlns="http://www.w3.org/1999/xhtml" xml:lang="en" lang="en">
    <xsl:call-template name="head" /> (4)
  <body>

  <form method="post" action="{$script}"> (5)

    <div id="detail">

      <h1><xsl:value-of select="$title"/></h1> (6)

      <!-- select only the first record in the XML document -->
      <xsl:apply-templates select="//person[1]" /> (7)

      <!-- look for optional messages -->
      <xsl:call-template name="message"/> (8)

      <!-- insert the scrolling links for main table -->
      <xsl:call-template name="scrolling" > (9)
        <xsl:with-param name="object" select="'person'"/>
      </xsl:call-template>

      <!-- create standard action buttons -->
      <xsl:call-template name="actbar"/> (10)

    </div>
  </form>
  </body>
  </html>

</xsl:template>

<xsl:template match="//person"> (11)

  <!-- table contains a row for each database field -->
  <table class="datatable">
    <colgroup width="100"/>
    <colgroup width="300"/>

    <tr class="detail">
      <td class="label">ID</td> (12)
      <td>
        <xsl:call-template name="datafield"> (13)
          <xsl:with-param name="item" select="person_id"/>
        </xsl:call-template>
      </td>
    </tr>

    <tr class="detail">
      <td class="label">First Name</td> (12)
      <td>
        <xsl:call-template name="datafield"> (13)
          <xsl:with-param name="item" select="first_name"/>
        </xsl:call-template>
      </td>
    </tr>

    <tr class="detail">
      <td class="label">Last Name</td> (12)
      <td>
        <xsl:call-template name="datafield"> (13)
          <xsl:with-param name="item" select="last_name"/>
        </xsl:call-template>
      </td>
    </tr>

    <tr class="detail">
      <td class="label">Initials</td> (12)
      <td>
        <xsl:call-template name="datafield"> (13)
          <xsl:with-param name="item" select="initials"/>
        </xsl:call-template>
      </td>
    </tr>

    <tr class="detail">
      <td class="label">Nat. Ins. No.</td> (12)
      <td>
        <xsl:call-template name="datafield"> (13)
          <xsl:with-param name="item" select="nat_ins_no"/>
        </xsl:call-template>
      </td>
    </tr>

    <tr class="detail">
      <td class="label">Person Type</td> (12)
      <td>
        <xsl:call-template name="datafield"> (13)
          <xsl:with-param name="item" select="pers_type_id"/>
        </xsl:call-template>
      </td>
    </tr>

    <tr class="detail">
      <td class="label">Star Sign</td> (12)
      <td>
        <xsl:call-template name="datafield"> (13)
          <xsl:with-param name="item" select="star_sign"/>
        </xsl:call-template>
      </td>
    </tr>

    <tr class="detail">
      <td class="label">E-Mail</td> (12)
      <td>
        <xsl:call-template name="datafield"> (13)
          <xsl:with-param name="item" select="email_addr"/>
        </xsl:call-template>
      </td>
    </tr>

    <tr class="detail">
      <td class="label">Start Date</td> (12)
      <td>
        <xsl:call-template name="datafield"> (13)
          <xsl:with-param name="item" select="start_date"/>
        </xsl:call-template>
      </td>
    </tr>

    <tr class="detail">
      <td class="label">End Date</td> (12)
      <td>
        <xsl:call-template name="datafield"> (13)
          <xsl:with-param name="item" select="end_date"/>
        </xsl:call-template>
      </td>
    </tr>
  </table>

</xsl:template>

</xsl:stylesheet>
Here is the description of the numbered items:
"/"). This is why each XML document must contain one and only one root node. This code block ends with the corresponding </xsl:template> line.head which is contained in std.head.xsl.message which is contained in std.message.xsl.scrolling which is contained in std.scrolling.xsl.actbar which is contained in std.actionbar.xsl.</xsl:template> line.datafield which is contained in std.data_field.xsl. A single parameter gives the name of the data item to be displayed. Notice that I am not specifying in this stylesheet which HTML control is going to be used for each field. This is decided at runtime by the value in the control attribute within the XML file. This makes it possible for a stylesheet to use different controls for the same field in different instances.These are stylesheet templates that are defined in their own separate files, but then 'included' into other XSL files during the transformation process. In this way changes can be made to one template and instantly inherited throughout the entire system.
<?xml version='1.0'?>
<xsl:stylesheet xmlns:xsl="http://www.w3.org/1999/XSL/Transform" version="1.0">

<xsl:template name="actbar"> (1)

  <table class="actionbar">
    <tr class="actionbar">
      <xsl:for-each select="//actbar/*"> (2)
        <!-- create a button for each element within actionbar -->
        <td class="actionbar">
          <input type="submit" name="{@id}" value="{node()}" /> (3)
        </td>
      </xsl:for-each>
    </tr>
  </table>

  <p class="script_time">page loaded in <xsl:value-of select="$script_time"/> seconds</p> (4)

</xsl:template>

</xsl:stylesheet>
Here is the description of the numbered items:
ID attribute as the internal identifier and the node's value as the button text.<xsl:template name="column_hdg"> <xsl:param name="item"/> (1) <xsl:param name="label"/> <xsl:choose> <xsl:when test="$numrows > 0"> (2) <!-- create hyperlink to sort on this field --> (3) <a href="{$script}?orderby={$item}"> <!-- this is the visible text for the hyperlink --> <xsl:value-of select="$label"/> </a> <!-- if sorted by this field insert ascending or descending image --> (4) <xsl:if test="$orderby=$item"> <img src="order_{$order}.gif" alt="order_{$order}.gif" /> </xsl:if> </xsl:when> <xsl:otherwise> <!-- no data to sort, so don't bother with the hyperlink --> (5) <xsl:value-of select="$label"/> </xsl:otherwise> </xsl:choose> </xsl:template>
Here is the description of the numbered items:
This template is actually comprised of a series of sub templates, starting with datafield. This is the main template that should be referenced in all component stylesheets as it chooses the HTML control using attribute values contained within the XML file. This allows the HTML control type to be decided at runtime instead of being hard-coded within the component stylesheet. Any other values required by individual templates for their control types must be supplied as additional attributes within the XML file.
<xsl:template name="datafield"> (1)
<xsl:param name="item"/>       <!-- the item name -->
<xsl:param name="multiple"/>   <!-- set this for more than one occurrence -->

  <!-- do nothing unless the item is present -->
  <xsl:if test="$item"> (2)

    <xsl:choose>

      <xsl:when test="$item/@nodisplay"> (3)
        <!-- 'nodisplay' attribute set, so display nothing -->
        <xsl:text> </xsl:text>
      </xsl:when>

      <xsl:when test="$item/@control='boolean'"> (4)
        <xsl:call-template name="boolean">
          <xsl:with-param name="item" select="$item"/>
          <xsl:with-param name="multiple" select="$multiple"/>
        </xsl:call-template>
      </xsl:when>

      <xsl:when test="$item/@control='dropdown'"> (4)
        <xsl:call-template name="dropdown">
          <xsl:with-param name="item" select="$item"/>
          <xsl:with-param name="multiple" select="$multiple"/>
        </xsl:call-template>
      </xsl:when>

      <xsl:when test="$item/@control='multiline'"> (4)
        <xsl:call-template name="multiline">
          <xsl:with-param name="item" select="$item"/>
          <xsl:with-param name="multiple" select="$multiple"/>
        </xsl:call-template>
      </xsl:when>

      <xsl:when test="$item/@control='popup'"> (4)
        <xsl:call-template name="popup">
          <xsl:with-param name="item" select="$item"/>
          <xsl:with-param name="multiple" select="$multiple"/>
        </xsl:call-template>
      </xsl:when>

      <xsl:when test="$item/@control='radiogroup'"> (4)
        <xsl:call-template name="radiogroup">
          <xsl:with-param name="item" select="$item"/>
          <xsl:with-param name="multiple" select="$multiple"/>
        </xsl:call-template>
      </xsl:when>

      <xsl:otherwise> <!-- this is the default control type -->
        <xsl:call-template name="textfield"> (5)
          <xsl:with-param name="item" select="$item"/>
          <xsl:with-param name="multiple" select="$multiple"/>
        </xsl:call-template>
      </xsl:otherwise>

    </xsl:choose>

  </xsl:if>

  <!-- check if field has error attribute set -->
  <xsl:if test="$item/@error"> (6)
    <br/><span class="error"><xsl:value-of select="$item/@error"/></span>
  </xsl:if>

</xsl:template>
Here is the description of the numbered items:
nodisplay attribute is set, in which case nothing is output.error attribute has been set.This deals with an entry in the XML file which looks something like this:
<tran_disabled control="boolean">N</tran_disabled>
<xsl:template name="boolean">
<xsl:param name="item"/>

  <xsl:choose>

    <xsl:when test="$mode='read' or $mode='delete' or $item/@noedit"> (1)
      <!-- field cannot be modified, so display as text -->
      <xsl:choose>
        <xsl:when test="$item='T' or $item='t' or $item='Y' or $item='y' or $item='1'"> (2)
          <xsl:text>Yes</xsl:text>
        </xsl:when>
        <xsl:otherwise>
          <xsl:text>No</xsl:text>
        </xsl:otherwise>
      </xsl:choose>
    </xsl:when>

    <xsl:when test="$mode='search'"> (3)
      <!-- create radio buttons for yes/no/undefined -->
      <input type="radio" name="{name($item)}" value="" CHECKED="CHECKED" />Undefined
      <input type="radio" name="{name($item)}" value="T" />Yes
      <input type="radio" name="{name($item)}" value="F" />No
    </xsl:when>

    <xsl:otherwise>
      <!-- field can be input or modified -->

      <!-- create radio buttons for 'yes' or 'no' -->
      <input type="radio" name="{name($item)}" value="T" > (4)
        <xsl:if test="$item='T' or $item='t' or $item='Y' or $item='y' or $item='1'">
          <xsl:attribute name="CHECKED">CHECKED</xsl:attribute>
        </xsl:if>
      </input>Yes
      <input type="radio" name="{name($item)}" value="F" > (5)
        <xsl:if test="not($item='T' or $item='t' or $item='Y' or $item='y' or $item='1')">
          <xsl:attribute name="CHECKED">CHECKED</xsl:attribute>
        </xsl:if>
      </input>No
    </xsl:otherwise>

  </xsl:choose>

</xsl:template>
Here is the description of the numbered items:
noedit attribute is set, the value will be output as plain text and will not be amendable.You may notice that I use two radio buttons instead of a single checkbox to represent a boolean item. This is because the $_POST array will only contain an entry for a checkbox when it is ON/TRUE/YES. You never see it with an OFF setting as it will be completely absent. By using radio buttons I can guarantee that the $_POST array will actually contain a value for OFF/FALSE/NO.
This deals with an entry in the XML file which looks something like this:
    <pers_type_id size="6"
                  control="dropdown"
                  optionlist="pers_type_id">DOLLY</pers_type_id>
  </person>
  <lookup>
    <pers_type_id>
      <option id=" "></option>
      <option id="ACTOR">Actor/Artiste</option>
      <option id="ANON">Anne Oni Mouse</option>
      <option id="BORING">Boring Person</option>
      ....
      <option id="QP">Of Questionable Parentage</option>
    </pers_type_id>
  </lookup>
<xsl:template name="dropdown">
<xsl:param name="item"/> <!-- the lookup value -->
<xsl:param name="multiple"/> <!-- optional, causes position number to be added to item name -->

  <xsl:variable name="position" select="position()" /> (1)
  <!-- this turns the value of the optionlist attribute into a node set -->
  <xsl:variable name="optionlist" select="//*[name()=$item/@optionlist]"/> (2)

  <xsl:choose>

    <xsl:when test="$mode='read'
                    or $mode='delete'
                    or $item/@noedit
                    or ($mode='update' and $item/@pkey)">

      <!-- item is read only, so output as plain text -->

      <!-- look for an option where the id attribute equals the lookup value -->
      <xsl:variable name="option" select="$optionlist/*[@id=$item]" /> (3)
      <xsl:choose>
        <xsl:when test="$option">
          <!-- entry found, so use it -->
          <xsl:value-of select="$option"/>
        </xsl:when>
        <xsl:otherwise>
          <!-- entry not found, so default to lookup value -->
          <xsl:value-of select="$item"/>
        </xsl:otherwise>
      </xsl:choose>

    </xsl:when>

    <xsl:otherwise> <!-- field can be modified -->

      <!-- create a select statement for $item with a list of options -->
      <select> (4)

        <xsl:attribute name="name">
          <xsl:choose>

            <!-- if 'multiple' is set then include row number in item name -->
            <xsl:when test="$multiple">
              <xsl:value-of select="concat(name($item),'[',$position,']')"/> (5)
            </xsl:when>
            <xsl:otherwise>
              <xsl:value-of select="name($item)"/> (6)
            </xsl:otherwise>

          </xsl:choose>
        </xsl:attribute>

        <xsl:for-each select="$optionlist/*"> (7)
          <!-- use the 'id' attribute of the node as the 'value' attribute of 'option' -->
          <option value="{@id}" >
            <xsl:choose>
              <xsl:when test="$item=@id">
                <!-- this option has been selected -->
                <xsl:attribute name="SELECTED">SELECTED</xsl:attribute>
              </xsl:when>
              <xsl:when test="$item=node()">
                <!-- this option has been selected (variation for ENUM fields) -->
                <xsl:attribute name="SELECTED">SELECTED</xsl:attribute>
              </xsl:when>
            </xsl:choose>
            <!-- output the value of the current option -->
            <xsl:value-of select="node()"/>
          </option>
        </xsl:for-each>

      </select>

    </xsl:otherwise>

  </xsl:choose>

</xsl:template>
Here is the description of the numbered items:
select statement.$multiple parameter is set.option statement for every entry in the option list, and will mark the relevant value as selected when it matches the current $item value.This deals with an entry in the XML file which looks something like this:
  <dialog_type_desc control="multiline"
                    cols="50"
                    rows="5">This is a lot of text</dialog_type_desc>
<xsl:template name="multiline">
<xsl:param name="item"/>

  <xsl:choose>

    <xsl:when test="$mode='search'">
      <!-- use a normal input box instead of a multiline textarea -->
      <input type="text" name="{name($item)}" value="{$item}" size="{$item/@cols}"/> (1)
    </xsl:when>

    <xsl:otherwise>

      <!-- create multiline field to allow data to be input or amended -->
      <textarea>
        <xsl:attribute name="name"><xsl:value-of select="name($item)"/></xsl:attribute> (2)
        <xsl:attribute name="rows"><xsl:value-of select="$item/@rows"/></xsl:attribute> (3)
        <xsl:attribute name="cols"><xsl:value-of select="$item/@cols"/></xsl:attribute> (4)

        <!-- under certain conditions set this field to read only -->
        <xsl:if test="$mode='read' or $mode='delete' or $item/@noedit">
          <xsl:attribute name="readonly">readonly</xsl:attribute> (5)
        </xsl:if>

        <xsl:value-of select="$item"/> (6)

      </textarea>

    </xsl:otherwise>

  </xsl:choose>

</xsl:template>
Here is the description of the numbered items:
rows attribute from the XML file.cols attribute from the XML file.For those of you who don't know what a popup is, it is a picklist that is too large for a dropdown, so it uses a separate screen. So instead of 'dropping down' it 'pops up'.
This deals with an entry in the XML file which looks something like this:
  <node_id size="4"
           control="popup"
           foreignfield="node_desc"
           popupname="tran#tree_structure_popup.php">5</node_id>
  <node_desc noedit="y">Section 1 (node 5)</node_desc>
<xsl:template name="popup">
<xsl:param name="item"/>      <!-- key pointing to foreign table -->

  <!-- this turns the value of the foreignfield attribute into a node set -->
  <xsl:variable name="foreignfield" select="//*[name()=$item/@foreignfield]"/> (1)

  <xsl:choose>

    <xsl:when test="$mode='read' or $mode='delete' or not($item/@popupname)">
      <!-- if $mode is read/delete then field is read only (not editable) -->
      <!-- therefore popup button is not wanted -->
      <!-- also ignore if $popupname is not supplied -->
    </xsl:when>

    <xsl:otherwise>
      <div class="popup"> (2)
        <!-- create a popup button -->
        <input type="image" name="{$item/@popupname}"
                            src="images/popup.gif"
                            alt="Call popup form to obtain value" />
      </div>
    </xsl:otherwise>

  </xsl:choose>

  <!-- display the value of the field from the foreign table -->
  <xsl:value-of select="$foreignfield"/> (3)

  <!-- hold the foreign key field, but do not display it -->
  <input type="hidden" name="{name($item)}" value="{$item}" /> (4)

</xsl:template>
Here is the description of the numbered items:
This deals with an entry in the XML file which looks something like this:
    <access_type control="radiogroup"
                 optionlist="access_type"
                 align="">Full</access_type>
  </mnu_item_access>
  <lookup>
    <access_type>
      <option id="1">Full</option>
      <option id="2">NOEDIT</option>
      <option id="3">NODISPLAY</option>
    </access_type>
  </lookup>
<xsl:template name="radiogroup">
<xsl:param name="item"/>        <!-- the lookup value -->
<xsl:param name="multiple"/>    <!-- optional, causes position number to be added to item name -->

  <xsl:variable name="position" select="position()" /> (1)
  <!-- this turns the value of the optionlist attribute into a node set -->
  <xsl:variable name="optionlist" select="//*[name()=$item/@optionlist]"/> (2)
  <!-- alignment is 'vertical' or 'horizontal' (default is 'horizontal') -->
  <xsl:variable name="align" select="substring($item/@align,1,1)"/> (3)

  <xsl:choose>

    <xsl:when test="$mode='read'
                    or $mode='delete'
                    or $item/@noedit
                    or ($mode='update' and $item/@pkey)">

      <!-- item is read only, so output as plain text -->

      <!-- look for an option where the id attribute equals the lookup value -->
      <xsl:variable name="option" select="$optionlist/*[@id=$item]" /> (4)

      <xsl:choose>
        <xsl:when test="$option">
          <!-- entry found, so use it -->
          <xsl:value-of select="$option"/>
        </xsl:when>
        <xsl:otherwise>
          <!-- entry not found, so default to lookup value -->
          <xsl:value-of select="$item"/>
        </xsl:otherwise>
      </xsl:choose>

    </xsl:when>

    <xsl:otherwise> <!-- field can be modified -->

      <!-- create an input statement for $item with a list of options -->
      <xsl:for-each select="$optionlist/*"> (5)

        <input type="radio" >

          <xsl:attribute name="name">
            <xsl:choose>
              <!-- if 'multiple' is set then include row number in item name -->
              <xsl:when test="$multiple">
                <xsl:value-of select="concat(name($optionlist),'[',$position,']')"/> (6)
              </xsl:when>
              <xsl:otherwise>
                <xsl:value-of select="name($optionlist)"/>
              </xsl:otherwise>
            </xsl:choose>
          </xsl:attribute>

          <xsl:attribute name="value">
            <xsl:value-of select="@id" /> (7)
          </xsl:attribute>

          <!-- use the 'id' attribute of the node as the 'value' attribute -->
          <xsl:if test="$item=@id">
            <!-- this option has been selected -->
            <xsl:attribute name="CHECKED">CHECKED</xsl:attribute> (8)
          </xsl:if>

          <xsl:if test="$item=node()">
            <!-- this option has been selected (variation for ENUM fields) -->
            <xsl:attribute name="CHECKED">CHECKED</xsl:attribute>
          </xsl:if>

        </input>

        <!-- output the value of the current option -->
        <xsl:value-of select="node()"/> (9)

        <!-- insert single space as a separator -->
        <xsl:text> </xsl:text>

        <xsl:if test="$align='v'"> (10)
          <!-- alignment is vertical, so insert line break after each option -->
          <br/>
        </xsl:if>

      </xsl:for-each>

    </xsl:otherwise>

  </xsl:choose>

</xsl:template>
Here is the description of the numbered items:
align attribute.id attribute matches the value of the current item so that it can be output to the HTML document as plain text.$item are in the HTML document as each one needs to contain its occurrence number in the name.value attribute of the current radio button to the contents of the id attribute of the current entry in the option list.checked attribute for this particular radio button in the group.This deals with an entry in the XML file which looks something like this:
<sec_class_id size="8" pkey="y">DEMO</sec_class_id>
<xsl:template name="textfield">
<xsl:param name="item"/>
<xsl:param name="multiple"/>

  <xsl:choose>

    <xsl:when test="$mode='read'
                    or $mode='delete'
                    or $item/@noedit
                    or ($mode='update' and $item/@pkey)">

      <!-- item is read only, so output value as plain text -->
      <xsl:value-of select="$item"/> (1)

    </xsl:when>

    <xsl:otherwise> <!-- field can be modified -->

      <input> (2)

        <xsl:choose>

          <!-- if 'multiple' indicator is set include position number -->
          <xsl:when test="$multiple">
            <xsl:attribute name="name">
              <xsl:value-of select="concat(name($item),'[',position(),']')"/> (3)
            </xsl:attribute>
          </xsl:when>
          <xsl:otherwise> <!-- use item name without any position number -->
            <xsl:attribute name="name">
              <xsl:value-of select="name($item)"/>
            </xsl:attribute>
          </xsl:otherwise>

        </xsl:choose>

        <xsl:choose>

          <!-- set type to either 'password' or 'text' -->
          <xsl:when test="$item/@password">
            <xsl:attribute name="type">password</xsl:attribute> (4)
          </xsl:when>
          <xsl:otherwise>
            <xsl:attribute name="type">text</xsl:attribute>
          </xsl:otherwise>

        </xsl:choose>

        <xsl:attribute name="value">
          <xsl:value-of select="$item"/> (5)
        </xsl:attribute>

        <xsl:attribute name="maxlength">
          <xsl:value-of select="$item/@size"/> (6)
        </xsl:attribute>

        <xsl:choose>

          <!-- if item size > 40 reduce display area to 40 characters -->
          <xsl:when test="$item/@size > 40"> (7)
            <xsl:attribute name="size">40</xsl:attribute>
          </xsl:when>
          <xsl:otherwise>
            <xsl:attribute name="size">
              <xsl:value-of select="$item/@size"/>
            </xsl:attribute>
          </xsl:otherwise>

        </xsl:choose>

      </input>

    </xsl:otherwise>

  </xsl:choose>

</xsl:template>
Here is the description of the numbered items:
$item are in the HTML document as each one needs to contain its occurrence number in the name.type attribute to either 'password' or 'text'.value attribute to the contents of $item.maxlength attribute to the item's size attribute.size attribute to a value no greater than 40 so that it will not extend to far in the output screen.<xsl:template name="head"> <head> <meta http-equiv="Content-Type" content="text/html; charset=UTF-8" /> <title><xsl:value-of select="$title"/></title> (1) <link rel="stylesheet" type="text/css" href="style.css" /> (2) </head> </xsl:template>
Here is the description of the numbered items:
<xsl:template name="message">

  <p class="message">
    <xsl:for-each select="//message/*"> (1)
      <xsl:value-of select="node()"/><br /> (2)
    </xsl:for-each>
  </p>

</xsl:template>
Here is the description of the numbered items:
<xsl:template name="navbar">

  <div id="navbar">
    <xsl:for-each select="//navbar/*"> (1)

      <p class="navbar">
        <!-- create a button for each element within navbar -->
        <input type="submit" name="{@id}" value="{node()}" /> (2)
      </p>

    </xsl:for-each>
  </div>

</xsl:template>
Here is the description of the numbered items:
ID attribute as the internal identifier and the node's value as the button text.This uses the following parameters which are made available during the XSL transformation process:
$script - the server-side script which is dealing with this document.$curpage - the number of the current page.$lastpage - the number of the last page in the current selection.<xsl:template name="pagination"> <table class="pagination"> <tr class="pagination"> <xsl:choose> <xsl:when test="$curpage=1"> (1) <!-- we are on page 1, so there is no navigation backwards --> <td class="pagination">FIRST</td> (2) <td class="pagination">PREV</td> </xsl:when> <xsl:otherwise> <!-- insert links for first/previous page --> <td class="pagination"> <a href="{$script}?page=1"><b>FIRST</b></a> </td> (3) <td class="pagination"> <a href="{$script}?page={$curpage -1}"><b>PREV</b></a> </td> </xsl:otherwise> </xsl:choose> <!-- insert "page x of y" --> <td class="pagination"> Page <xsl:value-of select="$curpage"/> of <xsl:value-of select="$lastpage"/> (4) </td> <xsl:choose> <xsl:when test="$curpage=$lastpage"> (5) <!-- we are on the last page, so there is no navigation forwards --> (6) <td class="pagination">NEXT</td> <td class="pagination">LAST</td> </xsl:when> <xsl:otherwise> <!-- insert links for last/next page --> (7) <td class="pagination"> <a href="{$script}?page={$curpage +1}"><b>NEXT</b></a> </td> <td class="pagination"> <a href="{$script}?page={$lastpage}"><b>LAST</b></a> </td> </xsl:otherwise> </xsl:choose> </tr> </table> </xsl:template>
Here is the description of the numbered items:
Page X of Y.This uses data included in the XML similar to this.
<xsl:template name="scrolling">
<xsl:param name="object" />

  <table class="scrolling">
    <tr class="scrolling">

      <!-- look for the entry with the specified value in the id attribute -->
      <xsl:for-each select="//scrolling/scroll[@id=$object]"> (1)

        <!-- include only if there is more than 1 item -->
        <xsl:if test="@lastitem>1"> (2)

          <xsl:choose>
            <xsl:when test="@curitem<=1"> (3)
              <!-- we are on item 1, so there is no navigation backwards -->
              <td class="scrolling">FIRST</td> (4)
              <td class="scrolling">PREV</td>
            </xsl:when>
            <xsl:otherwise>
              <!-- insert links for first/previous item -->
              <td class="scrolling">
                <a href="{$script}?scrolling={$object}&item=1"><b>FIRST</b></a>
              </td> (5)
              <td class="scrolling">
                <a href="{$script}?scrolling={$object}&item={@curitem -1}"><b>PREV</b></a>
              </td>
            </xsl:otherwise>
          </xsl:choose>

          <!-- insert "item x of y" -->
          <td class="scrolling">
            <xsl:text>Item </xsl:text> (6)
            <xsl:value-of select="@curitem"/>
            <xsl:text> of </xsl:text>
            <xsl:value-of select="@lastitem"/>
          </td>

          <xsl:choose>
            <xsl:when test="@curitem=@lastitem"> (7)
              <!-- we are on the last item, so there is no navigation forwards -->
              <td class="scrolling">NEXT</td> (8)
              <td class="scrolling">LAST</td>
            </xsl:when>
            <xsl:otherwise>
              <!-- insert links for last/next item --> (9)
              <td class="scrolling">
                <a href="{$script}?scrolling={$object}&item={@curitem +1}"><b>NEXT</b></a>
              </td>
              <td class="scrolling">
                <a href="{$script}?scrolling={$object}&item={@lastitem}"><b>LAST</b></a>
              </td>
            </xsl:otherwise>
          </xsl:choose>

        </xsl:if>

      </xsl:for-each>

    </tr>
  </table>

</xsl:template>
Here is the description of the numbered items:
Item X of Y.<xsl:template name="selectbox"> <div class="center"> <!-- create a checkbox which allows the current row to be selected --> <input type="checkbox" name="select[{position()}]" > (1) <xsl:if test="selected='T'"> <!-- this is to be marked as selected in the initial display --> <xsl:attribute name="checked">checked</xsl:attribute> (2) </xsl:if> </input> </div> </xsl:template>
Here is the description of the numbered items:
select[n] where 'n' is the current row number.I hope that I have been able to demonstrate that XSL is a powerful scripting language that is perfectly capable of producing an HTML page from an XML data source that can be generated statically or even dynamically. Any HTML that you can generate from your application language, whether it be UNIFACE, JAVA, C++, PHP, or even .NET, can also be generated by XSL.
As with all good languages XSL has the ability to define frequently-used code in a single place, then include it into as many other components as is desired.
The big advantage is that the XSL approach totally removes the need to have developers who are conversant in both your application/database language and the various web languages. Thus you can employ a separate group of people with HTML/CSS/XSL skills and leave your current developers to maintain the code that communicates with the database and applies the business rules.
Another advantage is that should you ever wish to change your main application language your investment in HTML/CSS/XSL scripts will not be lost as they are all reusable. It does not matter one jot what development language you use at the back end provided that it can generate XML data and perform an XSL transformation. The transformation process does not care how the XML file was produced, or what tool was used to produce it - it is simply a text file which has been built to the XML standards.
What I have demonstrated in this article is only a fraction of what can be done with XML and XSL. Both of these have existed as published standards in their current versions for several years, and, as with every other part of the internet, they are growing, changing and maturing. The next version of HTML will use features of XML to completely overhaul the way that forms are processed. Take a look at the specification for XFORMS which has recently been released as an official recommendation by the World Wide Web Consortium and see for yourself.
Since writing this document I have continued working on my XSL stylesheets and templates, trying to improve them, make them more flexible and increase the amount of reusable code. Although this document shows how it is possible to create a series of XSL stylesheets which call common code in the form of XSL templates which are maintained in separate files (similar to a library of subroutines), it does mean that each different screen still requires its own stylesheet in order to identify which fields go where in the HTML output. Although the stylesheet does specify which field to deal with, it does not specify which HTML control to use as that is supplied as attributes in the XML file. My datafield template examines the field's attributes, then calls another template to render the field in the required format. I began to wonder if it were possible to build a similar mechanism whereby the fieldlist could be passed as data in the XML file so that it need not be hard-coded in the XSL file.
It did not take long to create such a mechanism, and I have documented the results in Reusable XSL Stylesheets and Templates. The mechanism works as follows:
This mechanism proved to be so successful that I have incorporated it into my entire web application. I now have 350+ screens which are produced by no more than 8 XSL stylesheets. Can you achieve the same level of reusability in YOUR application?
| 03 Jun 2006 | Renumbered section 3.3 to section 5. The XSL 'include' files. |
| 29 Apr 2004 | Changed the visual style of each sample web page. |
| 6 Apr 2004 | Added a section which refers to a new document called Reusable XSL Stylesheets and Templates which describes a method whereby I can now use a single generic XSL stylesheet for a whole class of forms instead of having a customised version for each individual form. |
| 10 Nov 2003 | Added a reference to A Sample PHP Application which describes a set of PHP scripts which I have put together to demonstrate the techniques described in this document. These scripts can be run online, or the entire source code can be downloaded and run offline (if you have a working PHP environment).
Added section 5.8. std.scrolling.xsl Split section 5.3. std.data_field.xsl into smaller pieces. |