
| Author | : | A J Marston |
| Date Created | : | June, 1986 |
| Date Revised | : | February, 1992 |
| Version | : | 01.010.010 |
This is a flexible and customisable menu system with sophisticated and optional security features.
It can be used to control all the facilities (MPE commands, programs, and user applications) which are currently available on your HP3000. Users will only be able to see or select those functions which have been specifically released to them.
An application which has been developed as a stand-alone entity with its own in-built menu handler may be defined as a single option within this system. Alternatively each application module may be defined as a separate option so that full integration is achieved - this is possible regardless of the development language (eg: COBOL, TRANSACT, POWERHOUSE, etc), but best results are achieved if the modules are developed as COBOL subprograms.
Separate documentation is available which describes the procedures necessary which will enable a user application to be integrated fully with this Menu and Security system.
All the data required by the system is held on a single control database. A full set of maintenance transactions is built into the system to allow each site to customise the data to fit its own requirements.
All menu screens are defined on the control database, and are not constructed and displayed until actually requested. Any option which is not accessible by the user is not shown.
Each site may construct its own hierarchy of menus, and each user may be directed to start at any particular menu (or even a non-menu transaction) after signing on. Each session may access menus down to the tenth level.
Standard features include an online HELP facility, and the ability to produce a hard copy of the current screen on either a system printer or an attached/integral printer. The forms cache feature within VPLUS can be turned on for individual terminals that will support it.
Other options include: logical device security, variable time-outs, access counting, controlled shutdowns, a global message facility, the ability to temporarily suspend access to any transaction, and single user access at either the user or transaction level.
Before this system can be loaded the appropriate account and groups must be defined on your system:
Logon as the system manager and create the account as follows:
NEWACCT MENU,MGR;CAP=AM,AL,GL,ND,SF,IA,BA,LG,PH,DS;ACCESS=(R,W,A,L,X:AC)
Logon as the account manager and create these groups:
NEWGROUP PROG;CAP=IA,BA,PH,DS;ACCESS=(R,W,A,L,S,X:AC)

NEWGROUP DATA;CAP=IA,BA,LG;ACCESS=(R,W,A,L,S,X:AC)

NEWGROUP FORMS;CAP=IA,BA;ACCESS=(R,W,A,L,S,X:AC)

MEWGROUP QUERYXEQ;CAP=IA,BA;ACCESS=(R,W,A,L,S,X:AC)
Load the following files from the installation tape:
| MENU.PROG | menu program |
| MENUMSG.PROG | message catalog (compiled) |
| MENUHELP.PROG | help text catalog (compiled) |
| MENUSHUT.PROG | time-out program |
| MENUFAST.FORMS | fast forms file for the menu screens |
| MENUSC.DATA | control database schema |
| @.QUERYXEQ | QUERY XEQ files to list contents of the system database |
| MENUCF.PROG | change menu command file |
| MENULOAD.PROG | load data into menu database |
| MENUREG.PROG | registration file |
| MENUREGV.PROG | registration program |
NOTE: Native Mode versions (to run under MPE/XL) will be delivered in the NMPROG group.
Logon to the DATA group and create the MENU database as follows:
:FILE DBSTEXT=MENUSC
:FILE DBSLIST;DEV=LP
:RUN DBSCHEMA.PUB.SYS;PARM=3

:RUN DBUTIL.PUB.SYS,CREATE
>MENU
>EXIT
If this is a demonstration version supplied with a time-out date then it will run until the time-out date expires. At this point there are two options available:
In either case the files MENUREG.PROG and MENUREGV.PROG must be copied into the PUB group of the SYS account. You must then contact a member of the company's Technical Support Group to take the necessary action, which can be achieved over the telephone, thus avoiding the delay incurred by sending a new copy of the software.
If the software is supplied without a time-out date then it must be registered before it can be used.
Once the product has been registered on a particular processor it will run for eternity. Updated copies can be loaded without the need for re-registration. This software cannot, however, be copied onto another processor without being registered for that processor.
Once the software has been registered the files MENUREG.PUB.SYS and MENUREGV.PUB.SYS should not be interfered with, otherwise this will invalidate the registration and the software will not run.
Before the menu program will allow a user to logon and access the system there must be entries on the control database for that user, the maintenance transactions, and some menus. This initial set of data will be created as follows:
- Stand by to initialise the menu database !!
- Enter 8 character identity of Super User: <enter identity>
- Enter 20 character name for Super User: <enter name>
- Enter 8 character password for Super User: <enter password>
FILE MENU.DATA=MENU.group.account
RUN MENU.group.account
As the record for company "00" now exists the initialisation routine will not be repeated.
The control database has the following structure:
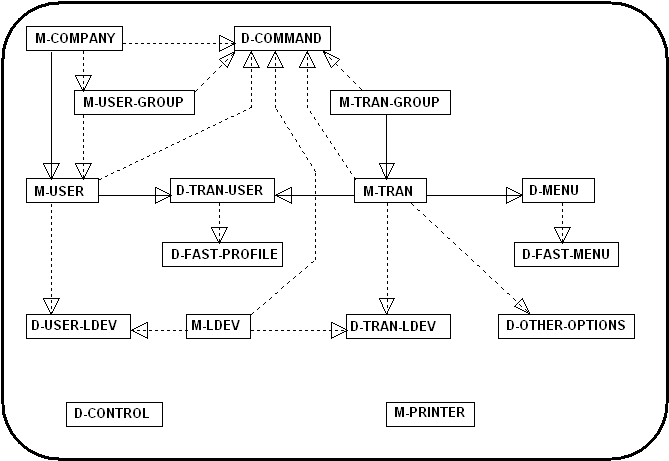
Each dataset is shown in a separate box. The "M-" prefix denotes a master dataset, and the "D-" prefix denotes a detail dataset. Where two datasets are joined by a line this indicates that the two datasets are related. The end of the line which contains the arrowhead indicates which is the "many" in the one-to-many relationship.
Where a relationship is shown with a solid line this indicates that an entry cannot exist on the "many" dataset unless a corresponding entry exists on the "one" dataset. However, it is possible for an entry to exist on the "one" without having an entry on the "many".
Where a relationship is shown with a dotted line this indicates that an entry can exist on the "many" dataset without being linked to an entry on the "one" dataset. This is known as an optional relationship.
There is one control record containing global parameters.
A company can have one or more users.
A company can have zero or more user groups.
A user must have a separate record for each company which he/she is allowed to access.
A user may be optionally linked to a user group which must have been defined for the same company.
Each user will have an individual list of transactions which he/she is allowed to access (this list is known as the user profile).
Each user may be restricted to one or more logical devices, or may have no device restrictions.
A transaction group may contain any number of transactions.
A transaction must be attached to a transaction group.
A transaction can be attached to zero or more menus.
A menu can contain any number of transactions.
A transaction may be attached to any number of user profiles.
A transaction may have an entry on D-OTHER-OPTIONS.
A transaction may be restricted to one or more logical devices, or may have no device restrictions.
Each device (terminal) will have a separate entry within the system.
Commands can be linked to companies, user groups, users, devices, transaction groups, and transactions.
One or more print devices may be defined.
Fast versions of menus and user profiles may be created to reduce the amount of time required to construct and display menu screens.
The Menu/Security program includes the following modules:
| CODE | DATASET | DESCRIPTION |
|---|---|---|
| MGR00 | D-CONTROL | control parameters |
| MGR01 | M-COMPANY | company maintenance |
| MGR02 | M-PRINTER | printer maintenance |
| MGR03 | M-TRAN-GROUP | transaction group maintenance |
| MGR04 | M-TRAN | transaction maintenance |
| MGR05 | M-USER | user maintenance |
| MGR06 | D-MENU D-FAST-MENU | menu maintenance fast menus |
| MGR07 | D-TRAN-USER D-FAST-PROFILE | user/transaction access (profiles) fast profiles |
| MGR08 | M-LDEV | device maintenance |
| MGR09 | D-TRAN-LDEV | transaction/device security |
| MGR10 | D-USER-LDEV | user/device security |
| MGR11 | D-COMMAND | command file maintenance |
| MGR12 | D-OTHER-OPTIONS | other option maintenance |
| MGR13 | M-USER-GROUP | user group maintenance |
| WHO | M-LDEV | display current users |
Each of these modules is documented fully in the User Manual.
These modules are automatically available to the Super User for each company, but will not be available to any other user unless they are added to that user's individual access profile.
The system can cater for up to 100 different companies, each with its own set of control parameters (access flag, time-out, welcome message, shutdown message) which apply to all users within that company.
There will always be a record for company "00" (the Master Company) whose name will be displayed on the sign-on screen.
Only a user of company "00" can create/enquire/modify records for other companies - a user of any other company can only enquire/modify the record for his logon company.
Each company may have any number of users, each having a separate entry on the M-USER dataset with a unique 8-character user identity, plus a separate profile which identifies the functions that the user is allowed to access.
A user may sign on to more than one company only if separate user records and access profiles have been defined for each company.
One user from each company is nominated as the Super User for that company. This user has certain privileges which are detailed in the following sections. It is recommended that the Super User identity not be used for general day-to-day activities - it should be used for system maintenance purposes only.
Within a company it is possible to divide the users into separate groups (or departments) so that control parameters (access flag, time-out) can be set for all users assigned to a particular group.
User groups are entirely optional - any number (including none) may be defined for each company, and individual users may be assigned to one or none of these groups.
This system can cater for the following transaction types:
Any existing functions which are invoked from a UDC (user defined command) can be added to the menu system by defining a transaction with the UDC name, and by defining the contents of the UDC on the command file.
The D-COMMAND dataset contains MPE commands (eg: file equates) which can be linked to specific items on the control database. These commands (which are fully customisable) are then processed when that item is selected.
This means that all commands are held in a central file, and are issued as and when necessary.
The items to which commands can be linked are as follows:
When the menu program is initiated, and before the LOGON screen is displayed, the following takes place:
The LOGON screen is then displayed, containing the welcome message from company "00". The user must enter his identity, password and company number (which defaults to the last company number specified on that device). These will be validated against the M-USER dataset. If a response is not made within the time limit defined on the system control record the menu program will terminate.
If an invalid password is attempted more times than the retry limit defined on the system control record the menu program will disable both the user and device records, then terminate. This "disabling" ability is achieved by setting the ACCESS-ALLOWED flag to "N" on the M-USER and M-LDEV records - these flags will remain set until cleared by the Super User, using the relevant maintenance transactions. The user may change his current password (if allowed, see section 5.5) by placing a value in the NEW PASSWORD field.
If, in a multi-company environment, the user is not sure which company number to use, a function key is available on the logon screen that will display a list of available company numbers and names.
The user may also nominate his starting transaction - if left blank then the contents of FIRST-TRAN on the M-USER record will be used instead. This will normally be a menu transaction, but any type of transaction is valid. If a non-menu transaction is selected the user will return to the logon screen when that transaction has completed.
Between the LOGON screen and the first transaction any entries on the command file for the logon company, user and user group are issued.
Once the user has successfully signed on the standard screen heading will show the user's name, the company/transaction group name, the identity of the transaction being processed, as well as the current date and time. All subsequent menu screens will show the welcome message from the selected company record.
There will be a separate entry on the M-USER dataset for each user who is allowed to access the system. Each of these records will hold the current password for that user identity in an encrypted form so that it cannot be examined or modified by any means other than via this menu/security program.
The contents of the M-USER dataset can be modified by using the relevant maintenance function as described in section 4, with additional options available by means of values which are held on the system control record, which are as follows:
| PSWD-CHANGE | If this is set to "Y" the user will be allowed to change his password by entering a value in the NEW PASSWORD field on the logon screen |
| PSWD-RETRIES | This defines the retry limit for invalid passwords on the logon screen. If this limit is exceeded the user and device records will be disabled and the system will terminate. A value of zero implies no limit. |
| PSWD-FORMAT | This defines the minimum pattern for new passwords using the characters A,N,X where
|
| PSWD-COUNT | Forces a new password to be entered via the logon screen after "n" logon attempts. The current counter for each password is held on the individual user record. |
| PSWD-DAYS | Forces a new password to be entered via the logon screen "n" days after the last password change. The change date for each password is held on the individual user record |
A menu is a transaction of type "ME". The contents of each menu have to be defined on dataset D-MENU by adding other transaction codes to that menu (see Appendix A).
There is no limit to the number of menus that can be defined on the menu database (other than the database capacities and the number of unique codes that can be defined in a 8-character field), but there is a limit to the menu hierarchy that can be active in any single session. This limit is currently 10 levels.
A menu can contain any number of transactions, although only 12 can be displayed at any one time. If there are more options the label NEXT PAGE will appear above function key 2 - press it and the next set of options will be displayed. This will cause the label PREVIOUS PAGE to appear above function key 1 - press it to go back to the previous set of options.
A particular transaction can be linked to any number of menus. It can even be linked to no menus at all so that its existence remains a secret - it can, however, be selected at any time provided that the transaction code is known.
When a menu screen is displayed the user will see only those transactions which are on his user profile.
A user may select a transaction either by using the index number as shown on the current screen, or by entering a transaction code. Any transaction code may be entered, even one that is not currently being displayed.
There are two reserved words that may be entered as dummy transaction codes on any menu screen in order to provide a quick way out of any menu hierarchy:
A user cannot access a transaction unless a record has been defined on the D-TRAN-USER dataset for that user and that transaction. This access list is known as the user profile.
There is one exception to this rule - anyone designated as a Super User (see the M-COMPANY record) has automatic access to any transaction in the system, and does not need a user profile.
When creating a profile for a new user there is the option to copy the profile of an existing user (but not the Super User) from either the logon company or another company, after which any other options can be added or deleted as required.
Options are also available to implement global changes:-
Each user's profile is checked when constructing menu screens - a menu option which is not also on the user's profile is not displayed.
Access to parts of the system can be further restricted by specifying security at the device level for individual transactions (or users) by adding records to the D-TRAN-LDEV (or D-USER-LDEV) datasets.
If a particular transaction has no entries on the D-TRAN-LDEV dataset then there are no device restrictions for that transaction. If a particular user has no entries on the D-USER-LDEV dataset then there are no device restrictions for that user. No device restrictions means that every device is considered to be a valid device.
As soon as the first device is identified for a transaction (or user) then device security is turned on for that transaction (or user). Further devices can be identified for individual transactions/users, thus extending the list of valid devices. Access to the transaction (or user) will be denied unless the logon device matches an entry in this list of valid devices. If the list is deleted for a particular entity then device security is turned off for that entity, and every device is considered to be a valid device.
As the D-TRAN-LDEV and D-USER-LDEV datasets start by being empty the system default is that there is no device security for any transaction or any user. It is not necessary to turn this security feature on for a particular transaction (or user) unless it is specifically desired to restrict access to that particular transaction (or user) to a subset of the available devices.
NOTE: If a particular device is to be considered as invalid for the entire system this can be achieved by setting the ACCESS-ALLOWED flag on that device record to "N". This will prevent anyone other than a Super User from passing the logon screen on that device.
Certain parts of the system can be restricted for access to a single user at a time. This is done by setting the relevant ACCESS-ALLOWED flag to "S" at any of the following levels:
Whenever any part of the system is "locked" in single-user access the IN-USE flag on the relevant record shows the logical device number of the session which "locked" that record. Items which are not "locked" will show the value zero in their IN-USE marker.
If a session terminates abnormally it will NOT clear any of the IN-USE markers which it has set. Please refer to Appendix H for the various methods of recovery.
There is the ability to temporarily deny access to parts of the system without having to delete data from the control database.
This is done by setting the ACCESS-ALLOWED flag to "N" for:
If transaction groups or transactions are disabled they will still appear on menu screens, but will be indicated with an asterisk.
If any part of the system is disabled in this fashion while it is currently being accessed by a user it will not cause the current transaction to abort. The ACCESS-ALLOWED flag is only checked when a new selection is made.
Access counting can be turned on or off by flags which are to be found on the company record. By turning ON this option the relevant counter will be incremented on combinations of the following datasets:
This feature has been provided so that the actual usage frequency of various parts of the system may be determined over a length of time. It should be noted that there is no facility within the menu system to initialise these counters - this must be built into any customer reports.
Time-out values can be specified for the following:
A transaction time-out is overruled by a user time-out (if one is specified). A user time-out is overruled by a user group time-out (if one is specified). A user group time-out is overruled by a company time-out (if one is specified).
A time-out value is expressed as a number of seconds:
The effect of a non-zero time-out is to simulate the pressing of the EXIT key (f8) if no other key is pressed within the specified time limit. The system will return to the previous function (a menu, or another transaction), when the time-out cycle will start again. This process will eventually stop at the LOGON screen where a different time-out value (as defined on the system control record) applies.
Two time-out values have special significance:
Changes to user, user group and transaction time-outs do not come into effect for a particular session until that session passes from the menu to another transaction (when the relevant records are reread as part of the selection validation).
Changes to the company time-out are brought into effect as soon as each application subprogram calls SAVINITFORM to load the next VPLUS form.
Time-outs can be used to remove users from the system in a controlled and safe manner - provided that there is no user dialogue while the database is being locked and updated.
Although time-out values can be set for transactions of type "MP" it is not possible for these to remain effective during the running of an external program unless that program contains the relevant code. There is, however, a method of terminating an external program if a company shutdown condition is set - please refer to section 5.20.
The M-LDEV dataset is updated by the menu program each time a user logs on, makes a valid selection, or logs off.
This information can therefore be examined at any time in order to display a list of all users who are currently accessing the system, and which transaction they are processing.
This ability is provided by the WHO transaction.
It is possible for the system supervisor to terminate active sessions by initiating a system shutdown, usually after the transmission of a warning message informing all currently active users that a shutdown is imminent.
The warning message is defined on the company record, and is normally blank. If this is changed to a non-blank value (using transaction MGR01) it is immediately transmitted to all sessions that are logged on to that company (see section 5.20 for precise details). This message will be displayed on the screen in the area used by the function key labels and will remain in place until the user hits the RETURN key.
For transactions of type "SP" (subprograms), "ME" (menus) or "JS" (jobstreams) the message will also be displayed in the window line using the shutdown enhancements defined on the company record. This will replace ordinary prompts (but not error messages) and will continue to be displayed until the message is changed.
If any users fail to heed this warning and do not terminate their sessions voluntarily, the system supervisor can terminate their sessions for them by setting the time-out value on the company record to either 1 or 2 seconds (see section 5.12). This has a different action depending on the type of transaction being processed by each session at that time:
|
If a son program is aborted in the middle of a database update it may result in corrupt or incomplete data. This option should therefore be used with extreme caution. |
Before a user's selection is actioned the menu program will check the following details on the control database:
Items marked with "*" will not be performed if the fast profile option has been turned on - see Appendix L.
If all this validation is successful the following will take place:
This method means that no application module need check that it is a valid selection before performing its designated function - it is not activated by the menu program unless it is valid, therefore further validation would be an unnecessary duplication of effort.
This system does not maintain its own audit file within the control database - instead it uses the standard transaction logging feature which is available to all IMAGE/TurboIMAGE users.
If any audit reports are required then this logging feature must be enabled for the MENU database. Any and all changes will therefore be recorded in the IMAGE transaction log file.
To assist in the analysis of this log file the ANALOG/V utility program (which can be purchased separately) can be used to create a series of serial disc files (one per dataset) which contain the data in a more readable format.
COBOL and/or QUIZ reports of the changes detailed in the ANALOG files are left to individual customers to prepare to their own requirements.
Analysis of the M-LDEV dataset in particular would show who logged on or off the system, which transaction they selected, and when.
Every subprogram that uses the UVPLUS subroutines to perform its screen handling will have function key f6 labelled PRINT SCREEN as standard. This will enable the user to produce a printed copy of the current screen on demand.
If the terminal is configured with an attached/integral printer then this will be used as the output device provided that a jcw with the name INTERNALPRINTER is set to 1. This can be achieved by adding the following command to the D-COMMAND dataset for the device so that it can be issued automatically whenever a session is initiated:
SETJCW INTERNALPRINTER=1
If this jcw is not set then the VPRINTFORM intrinsic will be called to create a print file with the identity of "FORMLIST". This will be directed to the system printer (class = LP) unless a file equate of the form:
FILE FORMLIST;DEV=27
has been previously issued. If required, this file equate can be set up on the D-COMMAND dataset, linked either to the user or the logical device.
Two further options are available when directing screen prints to the FORMLIST file which can be set by jcw's using the procedure outlined above:
VIEWPRINTCONTROL  =0 : do not underline data fields (default)
                  =1 : underline all data fields
VIEWFORMLISTCLOSE =0 : release file after each screen (default)
                  =1 : release file after leaving the transaction
                  =2 : release file when returning to the LOGON screen
NOTE: this screen-printing facility is not available for transactions of type "MP" (MPE commands and external programs) as their screen handling is not performed through the UVPLUS subroutines.
The online help facility can be invoked by pressing function key f7 (labelled HELP) at any time. This uses the standard MPE ":HELP" command to retrieve text from the help catalog (MENUHELP.PROG). This has the same format as the MPE help catalog (CICAT.PUB.SYS).
When first entered the utility will display the first page of text defined for the transaction being processed at the time when the HELP key was pressed. If any further pages of text are available for this transaction they will be identified as a series of KEYWORDS at the bottom of the display.
Any of these pages can be displayed by typing in the relevant keyword in the space provided and pressing the ENTER key. The user may return to the first page of text by pressing f1 (labelled FIRST PAGE).
Function key f7 (labelled RESUME) will return the user to his transaction without losing any data entered so far.
Function key f8 (labelled EXIT) will exit from the HELP routine and the transaction, returning to the previous menu.
NOTE: this facility is not available for transactions of type "MP" (MPE commands and external programs) as their screen handling is not performed through the UVPLUS subroutines.
It is possible to pass data between different processes in the same session by using an Extra Data Segment (XDS). Please refer to section 3 of the MPE INTRINSICS MANUAL for more details.
The menu program uses an XDS with the identity of "MU" to communicate with its son processes. This has a length of 512 words (508 in the data area plus 4 control words for use by MPE) and is described in Appendix I. It is used primarily for son processes developed specifically for this menu system (containing subprograms which can be identified as individual options on the menu database) but it can be used by other programs.
Before control is passed to any son process the contents of the XDS is updated down to XDS-FILLER1. Upon return from the son process the XDS is examined in case the values in the following areas have changed:
| XDS-MENU-AUTO-SELECT | If this contains a non-blank value it will be used by the menu program as the identity of the next transaction to be processed (see section 6.2). |
| XDS-VIEW-WINDOW | If this contains a non-blank value it will be used as the window message on the next menu screen. |
The following area within the XDS is maintained during the execution of any transaction of type "MP" (a series of MPE commands) and is also available for reading/writing by any son process.
| XDS-PARMS | These areas are accessed via the $PARMn command which is documented in Appendix F. Once a value has been defined for any one of these parameters it will remain available for the remainder of the session unless replaced by another value. |
Whenever the system supervisor initiates a shutdown (either a warning message or an actual shutdown - see section 5.14) this fact needs to be communicated to all relevant sessions - this is performed by the MENUSHUT program.
The MENUSHUT program is created as a son process to each menu session just before the first logon screen is displayed. It opens an IPC file (creating it if necessary) with the name LDEVnnnn.PUB.account (where "nnnn" is the unique logical device number, and the account is the logon account). It then waits for a record to be written to this IPC file, and performs no action until then.
Records are written to the IPC file when transaction MGR01 (company maintenance) is used to change the company time-out to 1 or 2 seconds, or the shutdown message to a non-blank value. All the devices which are currently logged on to this company are identified, and the relevant records ("SHUTDOWN1", "SHUTDOWN2", or "<message>") are added to each of their IPC files.
The action taken by each MENUSHUT program is determined by the content of the record which is read from its IPC file:
| "SHUTDOWN1" | Set jcw MENUSHUT to 1, and terminate. |
| "SHUTDOWN2" | Set jcw MENUSHUT to 2, and terminate. |
| "<message>" | Set jcw MENUSHUT to 3, display the message in that area of the screen used by the function key labels, then wait for another record. |
Shutdown messages may also appear in the window line of each screen, depending on the type of transaction being run (see section 5.14).
If the company time-out has been set to 1 or 2 seconds then all active sessions will be terminated - please refer to section 5.14 for details.
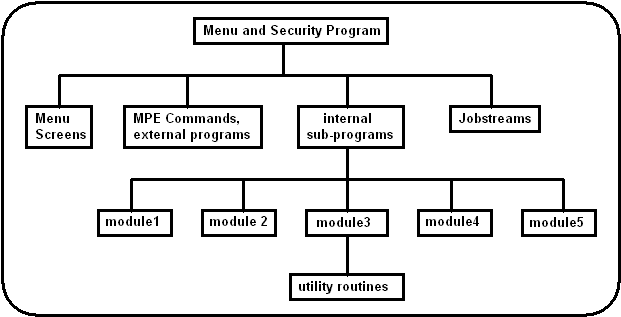
This system has been designed so that each module can only be called by the menu program itself and not by another module. Thus in order to switch from one module to another it is necessary to exit back to the menu program so that the next module can be called.
This method has been adopted for the following reasons:
Each module may include calls to several of the utility routines, but these use data items already defined in the menu program which are shared as part of the common linkage area.
The system structure can be represented as follows:
In any standard menu system the user must exit from his current transaction and return to a menu screen in order to select another transaction. This Menu system, however, has the ability to allow the user to select the next transaction before leaving the current one, thus avoiding the processing overhead of constructing and displaying a menu screen.
This is achieved when the current program places a transaction code in the linkage area named AUTO-SELECT before returning to the menu program. The menu program will detect a value in this area and process it as if it had been entered via a menu screen. All selection validation is performed as normal, it is only the menu screen processing that is avoided.
This gives the appearance of being able to move from one transaction to another without an intermediate step - this intermediate processing is still performed, however, but it is invisible to the user.
A choice of alternative transactions will normally be offered to the user via function keys. The transaction code loaded into AUTO-SELECT will therefore depend on which key is pressed. This ability has been built into several of the menu maintenance transactions (listed in Section 4) using the OTHER OPTIONS facility which is described in Section 6.3.
This is an extension of the pre-selection facility described in the previous section. Normally only a maximum of five options can be made available to the user - function keys 6,7 and 8 have predefined uses that cannot easily be changed.
This facility allows up to eighteen options to be defined for each subprogram that contains a call to the USELECT routine. As they are defined on the database and not hard-coded within each program these options can be modified at will using the maintenance transaction which has been built into the menu program (see Section 4).
This facility is available only in those transactions which include a call to the USELECT routine, usually invoked by pressing a function key labelled OTHER OPTIONS.
This subroutine will expect to find a record on the D-OTHER-OPTIONS dataset for the user's current transaction. This information is maintained by using transaction MGR12, and can contain up to eighteen options (transaction codes and associated function key labels).
If the D-OTHER-OPTIONS record does not exist for the current transaction a message will be displayed in the window line.
Each of the 18 options is compared with the user profile to check that it is accessible by the user - if it is not the function key label is blanked out. After all 18 options have been examined any intervening blanks are removed by moving up any remaining non-blank options.
If there are no accessible options for the current user a message will be displayed in the window line.
These 18 options will be displayed in sets of 6 using function keys f1 to f6. Function key f7 will be labelled NEXT OPTIONS (if there are any available), and f8 will be labelled ORIGINAL OPTIONS.
If any of f1-f6 is selected the corresponding transaction code will be put in the AUTO-SELECT area of common linkage - the current transaction will then return control to the menu program which, in turn, will pass control to the selected transaction as if it had been selected from a menu screen.
If f7 is selected the next set of options will be displayed.
If f8 is selected the USELECT routine will exit without placing a value in AUTO-SELECT, which will cause the original transaction to resume its processing.
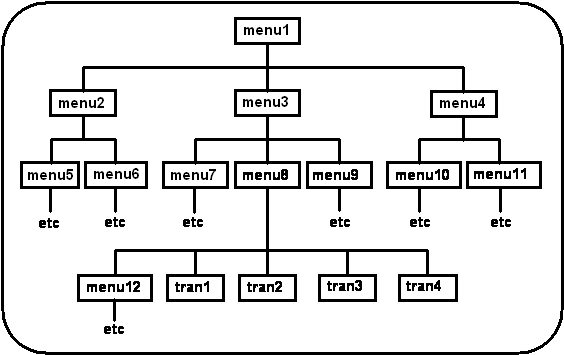
The physical hierarchy of transactions within the menu system is only one level deep, ie: a module can only be called by the menu program, and it can only pass control back to the menu program and not another module.
However, with the AUTO-SELECT and OTHER-OPTIONS features described in the previous sections it is possible for the user to select another module without having to process a menu screen. When these features are used the menu program will remember the sequence of module calls and maintain them in a pseudo-hierarchy, as in the following example:
menu screen --> module A --> B --> C --> D --> E --> F --> etc
This pseudo-hierarchy has a limit of thirty entries. Module A is the 1st entry, module B is the 2nd, and so on.
The entries in the pseudo-hierarchy are maintained as follows:
File equates can be added to the D-COMMAND dataset to be issued when certain events take place. All command sequences are identified by an entity type (two characters) which links to a dataset, and an entity name (up to ten characters) which relates to a specific entry on that dataset:
FILE FORMLIST;DEV=LP2The options identified in Appendix J may also be defined in this manner.
File equates (where necessary) have been set up for company "00" as follows:
FILE MENUFAST.FORMS=<formfile name>
FILE MENUMSG.PROG=<messagefile name>
FILE MENUHELP=<helpfile name>
FILE MENUSHUT=<shutdown program>
NOTE: any MPE command which produces output (eg: SHOWJOB) should be avoided as it will overwrite any unprotected areas on the current block-mode screen. These commands should only be included in transactions of type "MP" as the terminal is switched into character mode for the duration of that transaction.
Unlike the file equates mentioned in Appendix C which are issued just before control is passed to the selected function, it is possible to define a transaction which consists of nothing but a sequence of MPE commands. This simulates the User Defined Command (UDC) within MPE/V.
Any command that can be issued through the COMMAND intrinsic is valid, as well as the RUN command and some special commands which have significance only to this menu program.
NOTE: the Native Mode version of the menu program uses the HPCICOMMAND intrinsic, which allows UDC names or MPE/XL command file names as valid commands. The TIMER process (see section 5.20) should be turned off with the $TIMEROFF command otherwise the screen may hang.
This section defines how to call an external program in a sequence of commands as outlined in Appendix D.
QUIZ:      FILE QUIZUSE=<file>.<group>
           RUN QUIZ.CURRENT.COGNOS
QUICK:     FILE QKGO=<file>.<group>
           RUN QUICK.CURRENT.COGNOS
FIJI:      FILE FJIN=<file>.<group>
           RUN FIJI.UTIL.SYS;PARM=1
TRANSACT:  FILE TRANIN=<file>.<group>
           RUN TRANSACT.PUB.SYS
      or   RUN TRANSACT.PUB.SYS;INFO="<file>.<group>"
HPDESK: RUN HPMAIL.HPMAIL.SYS;PARM=7;INFO="%NAME:%PASS"
RUN {<program.group.account>},<entrypoint>
    {<*program> };PARM=nnnn
    ;LIB=G/P
    ;NOCB
    ;INFO="<string>"
    ;STDIN=<[*]name>
    ;STDLIST=<[*]name>
    ;XL="list"
    ;UNSAT=["]name["]
    ;LMAP
All parameters apart from the program identity are optional. The "&" character may be used to continue the command onto the next line, but the total length of the RUN statement must not exceed 216 characters. The string lengths for the "INFO=" and "XL=" parameters must not exceed 72 characters each, otherwise they will be truncated.The following special commands can be included in the command sequence for any type of transaction (except jobstreams). They must be the only command on the line.
| $WAIT | Waits for the user to hit the RETURN key before continuing. This should be placed after such commands as SHOWJOB so that the user has time to read the display before it disappears. |
| $LISTON | Displays each command line before it is actioned. |
| $LISTOFF | Opposite to $LISTON (the default). |
| $COMMENT <text> | Displays a message even if $LISTOFF is active. |
| $PAUSE <seconds> | Pause for a number of seconds (up to 32767). |
| $IF <condition> | Test for a value in a jcw (see Appendix F1). |
| $ELSE | Used after $IF to define commands to be processed if the previous condition was FALSE. |
| $ENDIF | Terminates any $IF/$ELSE sequence. |
| $NULL | A null statement (no action is performed). |
| $ERROR <text> | Causes the session to abort with this message in the error listing. |
| $FKEYn=<text> | Sets up a function key label and associated command (see Appendix F2). |
| ...?prompt?... | Display prompt and substitute the user's response (see Appendix F3). |
| $PARMn=<text> | Defines a default parameter (see Appendix F3 and Appendix F4). |
| $SHOWPIN | Display the list of programs and associated PIN (Process Identification Numbers) for those programs selected via type "MP" transactions which have suspended themselves. |
| $KILL <program> | Remove an entry from the list displayed by the $SHOWPIN command. |
| $COL132 | Switches terminal from 80 to 132 column mode. |
| $COL80 | Switches terminal from 132 to 80 column mode. |
| $CONTINUE | Do not abort if the next MPE command fails (this is similar to the standard MPE CONTINUE command). |
| $TIMEROFF | This is now redundant. |
| %<keyword> | Substitute values at run-time (see Appendix F5). |
Commands can be executed conditionally by testing the value of a JCW (job control word). Please refer to the :SETJCW command in the MPE V COMMANDS manual for an explanation of job control words.
The format of the statement is "$IF <jcwname><relop><value>" where:
"="   equal to
"<>"  not equal to
"<"   less than
">"   greater than
"<="  less than or equal to
">="  greater than or equal to
$IF statements cannot be nested - they must be separated by $ELSE or $ENDIF statements.
Here is an example:
SETJCW RUNJCW,OK
RUN PROG1
$IF RUNJCW=WARN
    $COMMENT PROG1 has non-fatal errors
$ELSE
    $IF RUNJCW>WARN
        $ERROR PROG1 has fatal errors
    $ELSE
        $COMMENT PROG1 complete - running PROG2
        RUN PROG2
        $COMMENT PROG2 complete
    $ENDIF
$ENDIF
$WAIT
Here is an example that demonstrates the $CONTINUE statement:
$CONTINUE
LISTF filename;$NULL (returns CIERR 907 if file does not exist)
$IF CIERROR<>0
    $COMMENT file does not exist - this point would not be reached
    $COMMENT if the $CONTINUE statement had not been specified
$ELSE
    $COMMENT file does exist
$ENDIF
Use can be made of the function keys during the execution of type "MP" transactions by defining a label and a string of text for as many keys as required within the command sequence. If one of the labelled function keys is pressed when a subsequent operation requests input the pre-defined string of text will be issued in its place. This allows frequently used responses to be input with a single keystroke.
The format of the command is "$FKEYn=<TEXT>" where:
| n | = | The function key number, in the range 1 to 8. |
| <text> | = | The 16-character label followed by the string to be issued when the function key is pressed. This string will be terminated by a carriage return unless appended by "<NOCR>", in which case the user has the opportunity of adding extra text before pressing the <RETURN> key. |
Here is an example:
$FKEY1=FIND FIRST      L FIRST
$FKEY2=PREV PAGE       L*-44/*-23
$FKEY3=UP HALF         L*-11/*+10
$FKEY4=NEXT PAGE       L*/*+21
$FKEY5=LIST ALL        L ALL
$FKEY6=SHOW ALL        S@.@;@
$FKEY7=FIND ERRORS     F@"COBOL ERRORS"
$FKEY8=EXIT            EXIT
RUN SPOOK5.PUB.SYS
It is possible to construct a command using values which are obtained at run time by prompting the user for parameters. This is achieved by defining a command line with the prompt text enclosed by "?". At run time the prompt text is displayed and replaced by the user's response.
Any number of prompts can be supplied in a single line.
A null response is not allowed - "//" will terminate all further processing for this transaction.
Here is an example:
LISTF ?Enter fileset?,2
FILE INPUT=?Enter input file?
FILE OUTPUT=?Enter output file?
PURGE *OUTPUT
RUN FCOPY.PUB.SYS;INFO="FROM=*INPUT;TO=*OUTPUT;NEW"
A similar result can be achieved by:
RUN FCOPY.PUB.SYS;INFO="FROM=?infile?;TO=?outfile (;NEW)?"
This facility can be mixed with other special commands as follows:
RECALL
$IF CIERROR=0
    REPLY ?Enter: PIN,Y/N or "//"?
$ELSE
    $WAIT
If the first character of the prompt text is numeric this defines the default value - see Appendix F4.
Default values for replies can be defined by using the "$PARMn=<text>" command, where "n" is a value between 0 and 9. If a prompt is prefixed by a number and the user replies by hitting carriage return, this null response is replaced by the associated default text. If the prompt has a number on its own then the default value will be substituted without any action by the user (unless no default has been defined).
Here is an example:
$PARM0=@
LISTF ?0Enter fileset?,2
This facility can be used to substitute a single response on more than one command line as follows:
$LISTON
$PARM0=?Enter filename to be copied?
LISTF ?0?,2
$PARM1=NEWFILE
$PARM2=?1Enter new file name (default is NEWFILE)?
PURGE ?2?
RUN FCOPY.PUB.SYS;INFO="FROM=?0?;TO=?2?;NEW"
LISTF ?2?,2
$WAIT
All "$PARMn" values will be stored in the menu area of the Extra Data Segment (see section 5.19), and are therefore available to external programs as well as all subsequent type "MP" transactions.
The following keywords can be included in the command sequence for any type of transaction except jobstreams. Each keyword will be replaced by the relevant value at runtime. They may appear anywhere in a line, and more than one can be specified within the same line.
| %USER | The user's menu logon identity (8 characters). |
| %NAME | Same as %USER. |
| %PASS | The user's menu logon password (8 characters). |
| %GROUP | The user's MPE logon group name (8 characters). |
| %ACCOUNT | The user's MPE logon account name (8 characters). |
| %LDEV | The user's MPE logon device number (4 digits). |
"AT=hh:mm"/"IN=days,hours,mins".%USER - replaced by the MPE logon userid %ACCOUNT - replaced by the MPE logon account %GROUP - replaced by the MPE logon groupExample:
!JOB JOB27,%USER.%ACCOUNT,%GROUP;INPRI=13
Example: !FILE <printfile>;DEV=PARM00;FORMS=<text>.
Example: PARMnn<prompt text> [rule1;rule2;rule3]
Only one of these PARMnn strings may be defined in a single line, but may begin anywhere in the line. The entire string (including prompt text and optional validation rules) cannot extend beyond the end of the line.
Before being streamed the keyword and following text (to the end of the line) will be replaced by the user's response. Any text in front of the PARMnn will remain unchanged.
The same keyword may be defined on more than one line in the jobstream, but the prompt text and validation rules from only the first occurrence will be used. This enables a single response to be inserted into the jobstream in more than one line.
| C | = compulsory (default is optional) |
| N | = numeric (default is any character) |
| U | = upshift (when inserted into jobstream) |
| DMY | = must be a valid date (in format DDMMYY) |
| D/M/Y | = must be a valid date (in format DD/MM/YY) |
| FILE | = must be a valid file name (syntax only) |
| IN a:b | = must be in the range a:b |
| IN a,b,c | = must be in the list (up to 10 values) |
| MINLEN n | = minimum length of user's input |
| MAXLEN n | = maximum length of user's input |
Note that the rules are upshifted before being processed, so that "in a:b" is treated as if it were "IN A:B". The user's response will not be upshifted unless the relevant rule is specified.
If the user's input fails any of these rules the error message will indicate the precise reason for the failure.
Note that is possible to define a combination of rules that are mutually exclusive, eg: [N;IN A:D] requires a numeric value that is in the range "A" to "D" - whatever the user enters will fail one or other of these rules.
[u;in y,n;=n] default = "N"
[dmy;=$today] default = today's date (in format DDMMYY)
[d/m/y;=$today] default = today's date (in format DD/MM/YY)
Note that the default value is not validated against any previous specifications, therefore [in 1:99;=abc] is valid.
PARM99 - logon company (2 characters)
PARM98 - logon user (8 characters)
PARM97 - user name (20 characters)
PARM96 - company name (40 characters - from screen heading)
PARM95 - current date (17 characters - from screen heading)
PARM94 - transaction code (8 characters)
PARM93 - transaction description (40 characters)
PARM92 - current time (8 characters - from screen heading)
These may appear anywhere in a line. More than one may be used on the same line, but the resulting character string must not exceed 80 characters.
!JOB FORMSETS,%USER.%ACCOUNT,%GROUP;OUTCLASS=PARM00
!FILE QSLIST;DEV=PARM00,1
!RUN QUERY.PUB.SYS
B=PARM01Enter database name [c;file]
PARM02Enter database password [c;maxlen 8]
5
O=LP
FORMSETS
EXIT
!EOJ
All unexpected errors are handled by the UERROR routine. This will print all known details from the COMMON-LINKAGE area in a file with the name of ERROR. It will also display a subset of those details on the $STDLIST device for that particular session. It will then call the QUITPROG intrinsic to terminate the session in an abnormal manner.
Because the session has not terminated by logging off in a normal fashion, the device record (M-LDEV) will still show the session active. If any IN-USE markers (for single user access) have been set by that session they will remain set, effectively "locking" those parts of the system.
These in-use markers can be reset in one of two ways:
"Recovering from previous session error on device NNNN"It will then call routine MENU01 to reset any in-use markers before displaying the logon screen.
These areas are used by the GETDSEG, DMOVIN and DMOVOUT intrinsics:
01  XDS-NUMBER                       PIC S9(4) COMP VALUE ZERO.
01  XDS-NAME                         PIC XX VALUE "MU".
01  XDS-ID REDEFINES XDS-NAME        PIC S9(4) COMP.
01  XDS-LENGTH                       PIC S9(4) COMP VALUE 508.
The data segment is defined in MENUXDS of STANDARD.LIB as follows:
01  EXTRA-DATA-SEGMENT.
    03  XDS-MENU-COMPANY             PIC X(2).
    03 	XDS-MENU-OPERATOR            PIC X(8).
    03 	XDS-OPERATOR-PASSWORD        PIC X(8).
    03 	XDS-MENU-HEADING-1.
        05  XDS-MENU-USER-NAME       PIC X(20).
        05  XDS-MENU-TITLE-1         PIC X(40).
        05  F                        PIC X.
        05  XDS-MENU-DATE            PIC X(17).
    03  XDS-MENU-HEADING-2.
        05  XDS-MENU-TRANSACTION     PIC X(8).
        05  F                        PIC X(12).
        05  XDS-MENU-TITLE-2         PIC X(40).
        05  F                        PIC X(10).
        05  XDS-MENU-TIME            PIC X(8).

* This area is referenced by subroutine UMPE
    03  XDS-PARMS.
        05  XDS-PARM                 PIC X(36) OCCURS 10.

* Offset = 267 words, length = 241 words
    03  XDS-FILLER                   PIC X(482).
    03  XDS-FILLER1 REDEFINES XDS-FILLER.
        05  XDS-VIEW-USER-TIME       PIC S9(4) COMP.
        05  XDS-MENU-SHUTDOWN-MSG    PIC X(60).
        05  XDS-MENU-SHUTDOWN-ENH    PIC S9(4) COMP.
        05  XDS-MENU-AUTO-SELECT     PIC X(8).
        05  XDS-VIEW-WINDOW          PIC X(80).
        05  XDS-VIEW-NUMERRS         PIC S9(4) COMP.
        05  XDS-VIEW-LASTKEY         PIC S9(4) COMP.
        05  XDS-VIEW-PREVIOUS-KEY    PIC S9(4) COMP.
        05  XDS-VIEW-TERMFILE        PIC X(8).
        05  XDS-MENU-ENTRY-POINT     PIC X(16).
        05  XDS-MENU-TRAN-LEVEL      PIC S9(4) COMP.
        05  XDS-MENU-ERROR-ENH       PIC S9(4) COMP.
        05  XDS-MENU-WINDOW-ENH      PIC S9(4) COMP.
        05  XDS-MENU-PRINTER-ID      PIC X(8).
        05  F                        PIC X(286).

    03  XDS-FILLER2 REDEFINES XDS-FILLER.
        05  XDS-USTREAM-TRAN-CODE    PIC X(08).
        05  XDS-USTREAM-PRINTER      PIC X(08).
        05  XDS-USTREAM-SCHEDULE     PIC X(16).
        05  XDS-USTREAM-STATUS       PIC 9(06).
        05  XDS-USTREAM-CIERR        PIC S9(4) COMP.
        05  F                        PIC X(442).

    03  XDS-FILLER3 REDEFINES XDS-FILLER.
        05  XDS-USELECT-LABELS.
            07  XDS-USELECT-LABEL    PIC X(16) OCCURS 18.
        05  XDS-USELECT-TRANS.
            07  XDS-USELECT-TRAN     PIC X(08) OCCURS 18.
        05  XDS-USELECT-STATUS       PIC 9(06).
        05  F                        PIC X(44).
Several options can be turned ON or OFF by setting jcw values. Below are the jcw names recognised by the menu system, and a description of the allowable values. If any of these jcw names is not defined then the value zero will be assumed.
| VIEWFORMSTORESIZE | If set to a value between 1-255 this will enable forms caching for your terminal. This value must be set BEFORE the terminal and formfile are opened to become effective, and will remain in force for the duration of the session. |
| INTERNALPRINTER | If set to 1 the screen print will be output to the terminal's internal printer instead of the print file with the designator "FORMLIST". |
The following options will not apply if INTERNALPRINTER=1:
| VIEWFORMLISTCLOSE | Determines when to close the print file "FORMLIST"
|
| VIEWPRINTCONTROL |
|
Appendix A shows how to create and modify entries on the database that will be used to construct menu screens. These are known as "slow" menus as each page of details will be constructed line by line as it is requested. The advantage of this method is that any changes (including changes to transaction descriptions) made while other users are accessing the system will automatically be reflected in the display the next time that the changed menu screen is requested.
However, once the menu structure has been defined to the satisfaction of the users it is unlikely that there will be regular or frequent changes, therefore the advantage of line-by-line construction becomes an overhead.
The "fast menu" option removes this overhead by holding an entire page of menu details (including the transaction descriptions) on a single record, thereby eliminating most of the disk accesses required to construct a menu page.
The ability to construct "fast" menus has been incorporated into the menu maintenance transaction MGR06 by means of function key options. Upon initial entry to this transaction there will be a function key labelled FAST MENU - if pressed the user is presented with further function keys labelled COMPILE ALL and DELETE ALL. If a particular menu is selected these labels will be replaced with COMPILE CURRENT and DELETE CURRENT. The COMPILE key will delete any "fast menu" record and construct a new one, (for all menus, or just the selected menu) whereas the DELETE key will simply remove the "fast menu" record(s) and not create a replacement.
Before any "fast" menus can be accessed by users the relevant flag must be set on the company record. This will be checked as each user passes through the LOGON screen. This flag may be unset while users are accessing the system, in which case they will immediately revert from "fast" to "slow" menu screens. However, if this flag is reset while users are accessing the system they will not revert back to "fast" menus unless they return to the LOGON screen.
IMPORTANT: If any changes are made to the contents of any menu screens they will not be incorporated in any "fast" versions until they are recompiled using the above-mentioned procedure.
Appendix B shows how to create and modify entries on the database that will be used to verify user access to individual transactions. These are known as "slow" profiles as each individual reference will require a separate disk access to check if an entry exists or not. The advantage of this method is that any changes made while other users are accessing the system will automatically be reflected in any subsequent profile validation.
However, once each user's profile has been fully defined it is unlikely that there will be regular or frequent changes, therefore the advantage of constant validation against the current contents of the database becomes an overhead.
The "fast profile" option removes this overhead by holding the entire profile for each user on a single record, which is read into memory as the user passes the LOGON screen. All subsequent profile validation can therefore be performed within memory without the need for any further disk accesses.
The ability to construct "fast" profiles has been incorporated into the profile maintenance transaction MGR07 by means of function key options. Upon initial entry to this transaction there will be a function key labelled FAST PROFILE - if pressed the user is presented with further function keys labelled COMPILE ALL and DELETE ALL. If a particular user is selected these labels will be replaced with COMPILE CURRENT and DELETE CURRENT. The COMPILE key will delete any "fast profile" record and construct a new one, (for all users, or just the selected user) whereas the DELETE key will simply remove the "fast profile" record(s) and not create a replacement.
Before any "fast" profiles can be accessed by users the relevant flag must be set on the company record. This will be checked as each user passes through the LOGON screen. This flag may be unset while users are accessing the system, in which case they will immediately revert from "fast" to "slow" profiles. However, if this flag is reset while users are accessing the system they will not revert back to "fast" profiles unless they return to the LOGON screen.
IMPORTANT: If any changes are made to the contents of any user profiles they will not be incorporated in any "fast" versions until they are recompiled using the above-mentioned procedure.
- END -