


|
Main Index
PREV
NEXT
|
It is a good idea to wait until the Business Application Model (BAM) has been created before attempting to create the Presentation Application Model (PAM). It may be that the BAM is already being used in an existing 2-tier system which is going to be replaced or enhanced by components using the 3-tier architecture. For new development it is still wiser to build the PAM from the BAM rather than the other way around.
There are three basic ways of creating entities in the Presentation Application Model:
This is the quickest method. Within the IDF enter the Model Editor and select the desired application model. From the pulldown menu select Edit - Duplicate Model, then enter the name for the new model. My convention for naming PAMs is to use the BAM name but with a "_PAM" suffix. This immediately identifies it as a model for the presentation layer as well as identifying the BAM to which it is related.
I once toyed with the idea of renaming all my BAMs to include a "_BAM" suffix, but decided not to as it would mean having to modify all my existing 2-tier components. I'm quite happy with the idea that if a model name does not contain "_PAM" it is a BAM by default.
Use this method if new entities are added to the BAM after the PAM has been created. Within the IDF enter the Model Editor, select the desired application model and press the Entities button. Then select the desired entity and from the pulldown menu select Edit - Duplicate Entity. When the dialog box appears select the name of the desired PAM, then enter the name for the duplicate entity.
PAM entities can be created manually in those cases where a corresponding BAM entity does not exist therefore cannot be copied. The procedure is identical to that for BAM entities.
The only keys that need be defined for PAM entities are primary keys and candidate keys. This is so that the uniqueness of any values can be checked in the usual <validate key> and <leave modified key> triggers.
Indexes should not be defined as they have no meaning in the PAM.
If you copy the whole application model then any relationships between a BAM entity and another BAM entity are correctly transferred as a PAM-to-PAM relationship.
If you copy a BAM entity on its own then any BAM-to-BAM relationship will now appear as a PAM-to-BAM relationship, which is not good. You must remove the relationship with the BAM entity and replace it with one for the corresponding PAM entity.
You should check all relationships to ensure that they link only to other PAM entities and not to BAM entities. Remember that in a 3-tier structure a presentation layer component should never refer to a BAM entity, so relationships between PAM and BAM entities are invalid.
Even though the PAM entities do not physically exist the relationships should still be defined as they allow foreign keys to be correctly transported when related entities are painted in a component. The alternative would be to handle the key transportation manually, but then you would be defeating the purpose of using a 4GL.
You may give the PAM entity the same name as its BAM equivalent, but if the BAM name is obscure you may give the PAM equivalent a name that is more meaningful or user-friendly. The translation between the two names will be defined in the mapping options.
Although the PAM entities are theoretically non-database you should not set the DBMS Path to 'Not in database' as this will prevent the $ENTINFO function from being used to identify the name of the session service for that entity. Only those PAM entities which do not have a BAM equivalent should be defined as 'Not in database'. The DBMS path should therefore be set to 'DEFAULT'. To prevent any accidental attempt at connecting a PAM entity to a physical database you may insert the line *.*_pam $NULL:*.*_pam in the [entities] section of your assignment file.
In order to identify the session service that will deal with this entity you must change Default Data Access from DBMS Path to Object Service, then enter the name of the session service in the Object Service Name box. If you do not do this the GET_DATA and PUT_DATA procs will fail.
The triggers for PAM entities should be set as follows:
| trigger | contents |
|---|---|
| read | #include STD:READ_TRIGGER |
| write | #include STD:WRITE_TRIGGER |
| delete | #include STD:DELETE_TRIGGER |
| lock | #include STD:LOCK_TRIGGER |
| remove occurrence | return(-1) |
| help | call HELP_PROC |
| add/insert occurrence | return(-1) |
| leave modified key | #include STD:LMK_TRIGGER |
| on error | call ON_ERROR_E |
| validate occurrence | #include STD:VLDO_TRIGGER (optional - if omitted the validation will be performed later) |
| validate key | #include STD:VLDK_TRIGGER |
Note that some of these include procs will insert different code if the component constant <P_LAYER> is set to "T" in the component. This is automatically included in the component templates for presentation layer components.
DTDs are Document Type Definitions which define the structure of entity and field names that exist within the associated XML stream. Whenever the XMLSAVE or XMLLOAD commands are used a DTD must be specified so that UNIFACE knows how to transfer data between the UNIFACE component and the XML stream.
To create or maintain DTDs you must first enter the Model Editor, then from the pulldown menu select Goto - DTDs. This will bring up the Open DTD dialog box as shown in figure 1:
Figure 1 - Open DTD dialog box, select model name
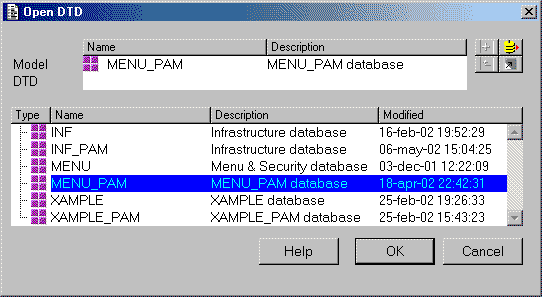
Select the model you require and press the OK button. This will then change to show what DTDs (if any) exist within the selected model, as shown in figure 2. Note that you should only be defining DTDs in a Presentation Application Model (with a "_PAM" suffix).
Figure 2 - Open DTD dialog box, enter DTD name
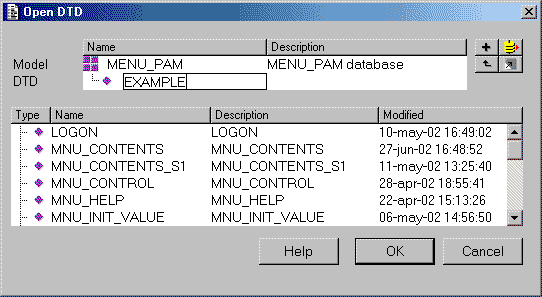
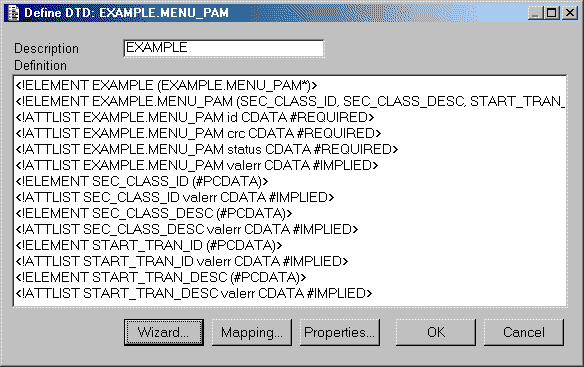
Here you may either select an existing DTD or enter the name for a new one. If a new name is entered the dialog box shown in figure 3 will appear so that you can confirm that you actually want to create a new DTD. Note that you should be using the name of an entity that has already been defined within that model. In order to retrieve data for a PAM entity the GET_DATA proc expects to find a DTD with the same name as the entity. In this example I am using the name 'EXAMPLE'.
Figure 3 - confirm creation of new DTD
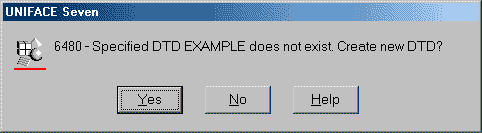
By pressing the OK button you will then be taken to the Define DTD dialog box, as shown in figure 4:
Figure 4 - Define DTD dialog box
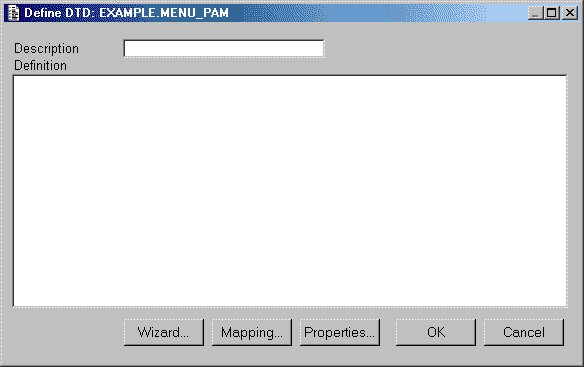
Enter the entity name in the Description field, then press the Wizard button to bring up the dialog box shown in figure 5. The Definition box will be blank until you have entered details via the Wizard.
Figure 5 - DTD Wizard dialog box
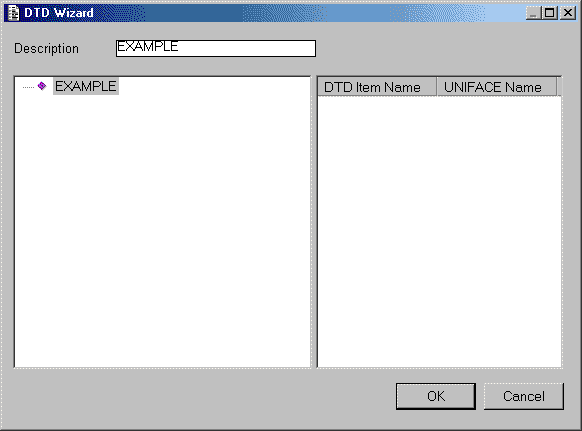
The left-hand pane will contain the Document Type Definition in the form of a tree structure. The root of the structure will be the DTD name as entered in the Open DTD dialog box as shown in figure 1. Select the root element then right-click to bring up the context menu shown in figure 6:
Figure 6 - context menu on root element
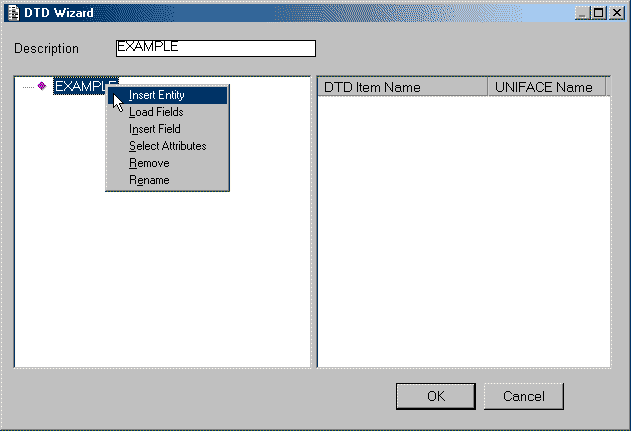
Select Insert Entity to bring up dialog boxes from which you can select a model and an entity, as shown in figure 7.
Figure 7 - select entity

Select the required entity and press the OK button. This will return you to the previous screen with the entity inserted into the document structure, as shown in figure 8:
Figure 8 - DTD with entity selected

Select the entity element, then right-click to bring up the context menu shown in figure 9:
Figure 9 - context menu on entity element
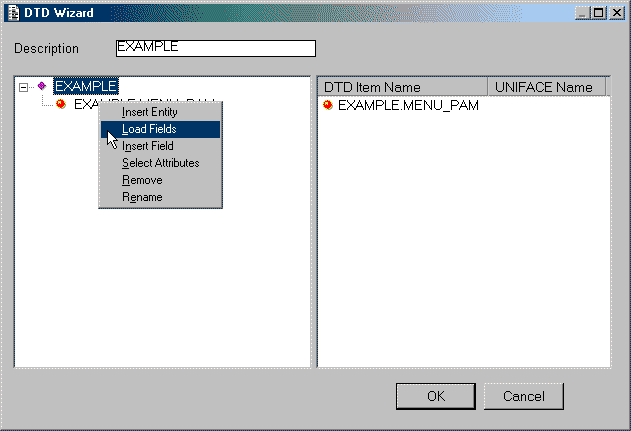
Select Load Fields, which will bring up the dialog box shown in figure 10:
Figure 10 - Load Fields dialog box
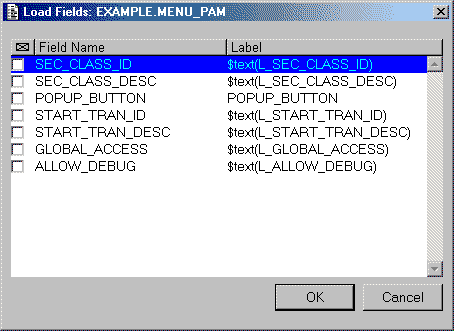
Within the Load Fields dialog box you may select/deselect individual fields by using the checkbox next to the field name, or you may select/deselect all the fields by clicking on the button above the column of checkboxes. Press the OK button to return to the previous screen, as shown in figure 11:
Figure 11 - DTD with fields selected
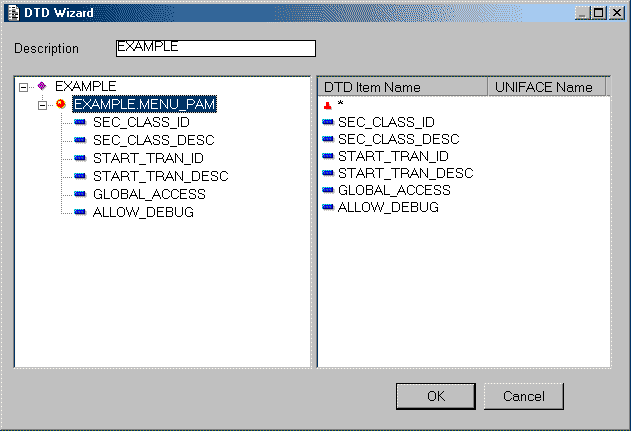
This shows you the amended document structure with the field elements below the entity element. Note that this is a tree structure, so each element which has a child element has either a '+' or a '-' sign to its left. Click on the '+' sign to expand any child elements, or click on the '-' sign to compress any child elements. Select the entity element, then right-click to bring up the context menu shown in figure 12:
Figure 12
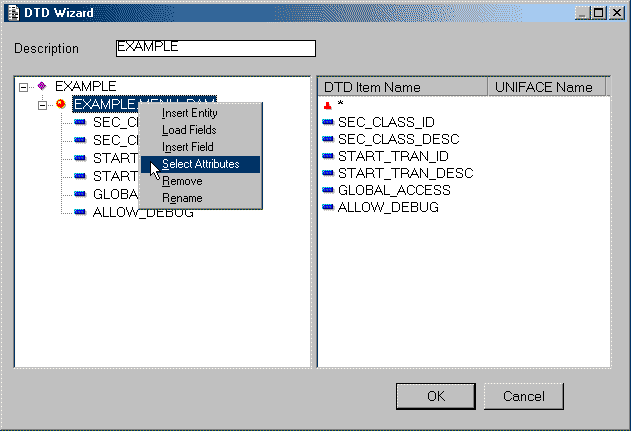
Select Select Attributes, which will bring up the dialog box shown in figure 13:
Figure 13 - Select Attributes dialog box.
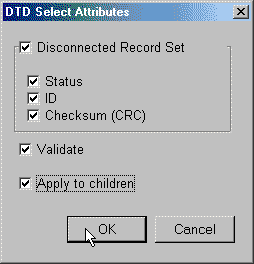
Use this screen to select the processing attributes that you require in this DTD. Select all the attributes, then press the OK button. This will return you to the previous screen, as shown in figure 14:
Figure 14 - DTD with selected attributes
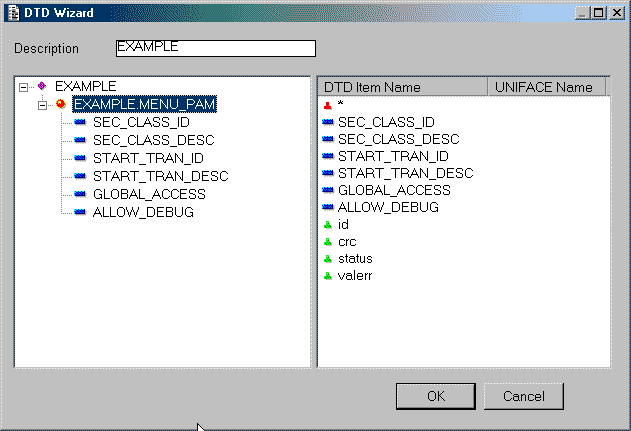
The selected attributes will show in the right-hand pane as id, crc, status and valerr.
This is a simple DTD structure, but you can make more complicated structures by adding in more entities, either as siblings (alongside an existing entity) or as a child to an existing entity. Press the OK button to return to the Define DTD screen with the details filled in, as shown in figure 15:
Figure 15 - DTD with definition details filled in
Press the Properties button to bring up the DTD Properties dialog box, as shown in figure 16:
Figure 16 - DTD Properties screen
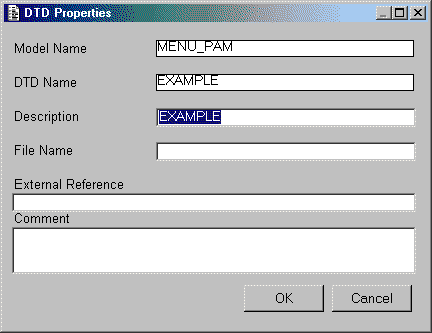
If you enter a value for File Name the DTD details will be written out to this file whenever it is compiled. This field is optional, because UNIFACE stores DTDs in the URR file during compilation. You can choose to save the DTD to a file if 3GL applications need to access the DTD.
The External Reference is a URI (Uniform Resource Identifier) for the DTD. UNIFACE can include this URI in XML streams based on the current DTD if you wish to make this DTD available to non-UNIFACE components. This field is optional, as UNIFACE components get DTD information from the URR file, and do not use the URI specified in this field to locate the DTD.
The default mapping details will be referenced whenever the XMLLOAD or XMLSAVE commands are used with the /incldefmap switch. These are used to convert element names between the UNIFACE component and the XML stream. Note that as the DTDs are built using entities from the PAM no mapping options should be needed in any presentation layer component as they also reference entities from the PAM. All PAM-to-BAM and BAM-to-PAM conversions are handled by components in the business layer.
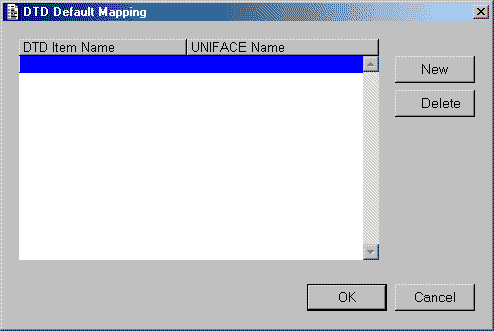
To maintain the mapping options you must press the Mapping button on the Define DTD screen, as shown in figure 15. This will bring up the dialog box shown in figure 17:
Figure 17 - DTD Default Mapping maintenance screen
The DTD Item Name refers to an element which exists in the DTD as entered via the DTD Wizard (example in figure 14). This field is case sensitive, so any DTD element name must be entered in exactly the same case, upper or lower, as it appears in the DTD Wizard. You must also specify the whole of the name as it appears in the DTD. Entities are shown as 'entity.model', whereas fields may be shown as either 'field' or 'field.entity.model'.
The UNIFACE Name is the name of the corresponding element as it is known to UNIFACE. This is not case sensitive, and anything you enter will automatically appear in upper case. It is recommended that you fully qualify each element with the entity and model name so as to avoid possible confusion at runtime when the DTD is referenced in a component.
Figure 18 - DTD default mapping details
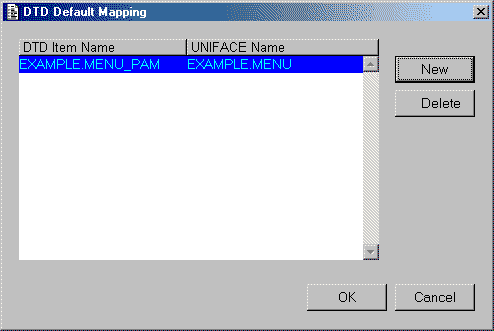
The entity EXAMPLE.MENU_PAM does not exist, therefore it must be mapped it to the corresponding entity which in this case is EXAMPLE.MENU. Enter these details in the screen as shown in figure 18, press the OK button to return to the Define DTD screen (see figure 15), then press the Wizard button to see the results as shown in figure 19:
Figure 19 - DTD Wizard screen showing mapping details
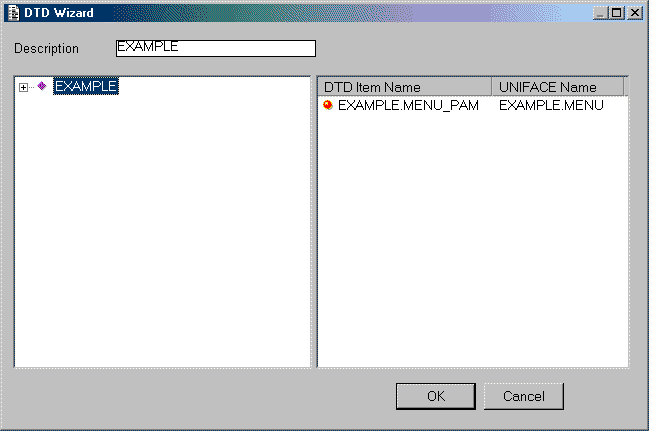
In the right-hand pane on this screen you will see two columns - one labeled DTD Item Name and another labeled UNIFACE Name. These will show any default mapping options that have been defined for the DTD.
After you have created a DTD and any default mapping options you must compile the DTD so that a copy exists in the URR file. From within the DTD Wizard screen select File on the pulldown menu. This will bring up a list of options as shown in figure 20:
Figure 20 - compiling a DTD from the DTD Wizard screen
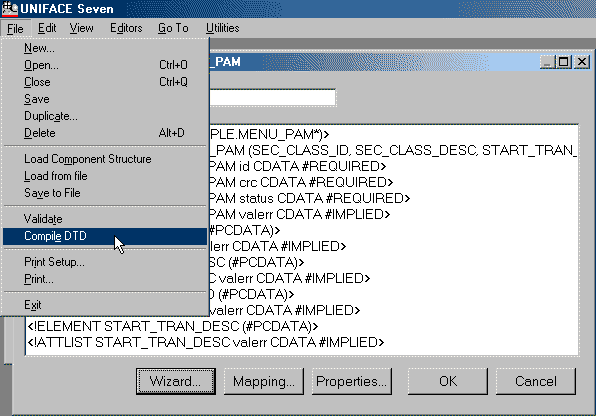
Use the Compile DTD option to compile the DTD into the URR file. If you have specified a file name in the DTD Properties screen (see figure 16) this will write a copy of the DTD to that file.
You may give a field on a PAM entity the same name as its BAM equivalent, but if the BAM name is obscure you may give the PAM equivalent a name that is more meaningful or user-friendly. The translation between the two names will be defined in the mapping options.
Although the PAM entities are theoretically non-database you should not set the field's Characteristics to 'Non-database' as this will prevent the $SELECTLIST function from being used to identity the list of fields that are required by the presentation layer component. Each field's Characteristics should therefore be set to 'Database'.
You may also change any field (except primary/candidate keys) marked as mandatory into optional. The mandatory constraint on the equivalent field in the BAM entity will not be checked until that field is validated in the session service.
The triggers for fields in PAM entities should be set as follows:
| name | contents |
|---|---|
| on error | call ON_ERROR_F |
| validate field | #include STD:VLDF_TRIGGER (optional - if omitted the validation will be performed later) |
| format/deformat | may be used if required |
| encrypt/decrypt | should only be used in the session service |
 |
http://www.tonymarston.net |